Battery Pack
Follow all safety guidelines when handling the battery pack.

Risk of electric shock.
Prior to recycling the battery pack, protect exposed terminals with heavy insulating tape to prevent shorting.
Disconnect all test leads and turn diagnostic tools off before removing the battery pack.
Do not attempt to disassemble the battery or remove any component projecting from or protecting the battery terminals.
Do not expose the diagnostic tool or battery pack to rain, snow, or wet conditions.
Do not short circuit the battery terminals.
Electric shock can cause injury.

Risk of explosion.
The Lithium battery is factory replaceable only, incorrect replacement or tampering with the battery pack may cause an explosion.
Explosion can cause death or serious injury.
The battery pack contains no user serviceable components. Tampering with the battery pack terminals or housing will void the product warranty.
Keep the following in mind when using and handling the battery pack:
| ● | Do not short circuit battery pack terminals. |
| ● | Do not immerse the diagnostic tool or battery pack in water, or allow water to enter the diagnostic tool or battery pack. |
| ● | Do not crush, disassemble, or tamper with the battery pack. |
| ● | Do not heat the battery pack to over 100°C (212°F), or dispose of it in a fire. |
| ● | Do not expose the battery pack to excessive physical shock or vibration. |
| ● | Keep the battery pack out of reach of children. |
| ● | Do not use a battery pack that appears to have suffered abuse or damage. |
| ● | Charge the battery pack in the appropriate charger only. |
| ● | Do not use a battery charger that has been modified or damaged. |
| ● | Use the battery pack for the specified product only. |
| ● | Store the battery pack in a cool, dry, well ventilated area. |
The battery pack should be used within a short period of time (about 30 days) after charging to prevent loss of capacity due to self-discharging.
If long-term storage of the battery pack is necessary, it should be stored in a in a cool, dry, well ventilated place with a 30 to 75 percent state of charge to prevent loss of characteristics.
To prolong the life of your battery, turn off the diagnostic tool when not in use. The diagnostic tool has a built in charger that recharges the battery on demand whenever it is connected to a power source.
Only use the manufacturer recommended original equipment replacement battery pack.
Removal
| 1. | Loosen the battery cover screws on the back-side of the diagnostic tool. |
| 2. | Pull up and out on the lower edge of the battery cover to release it. |
| 3. | Remove the battery pack in the same manner as the battery cover, pulling the bottom edge up and tilting out. |
Installation
Watch the beginning of this video for typical battery installation instructions. Opens in a new tab.
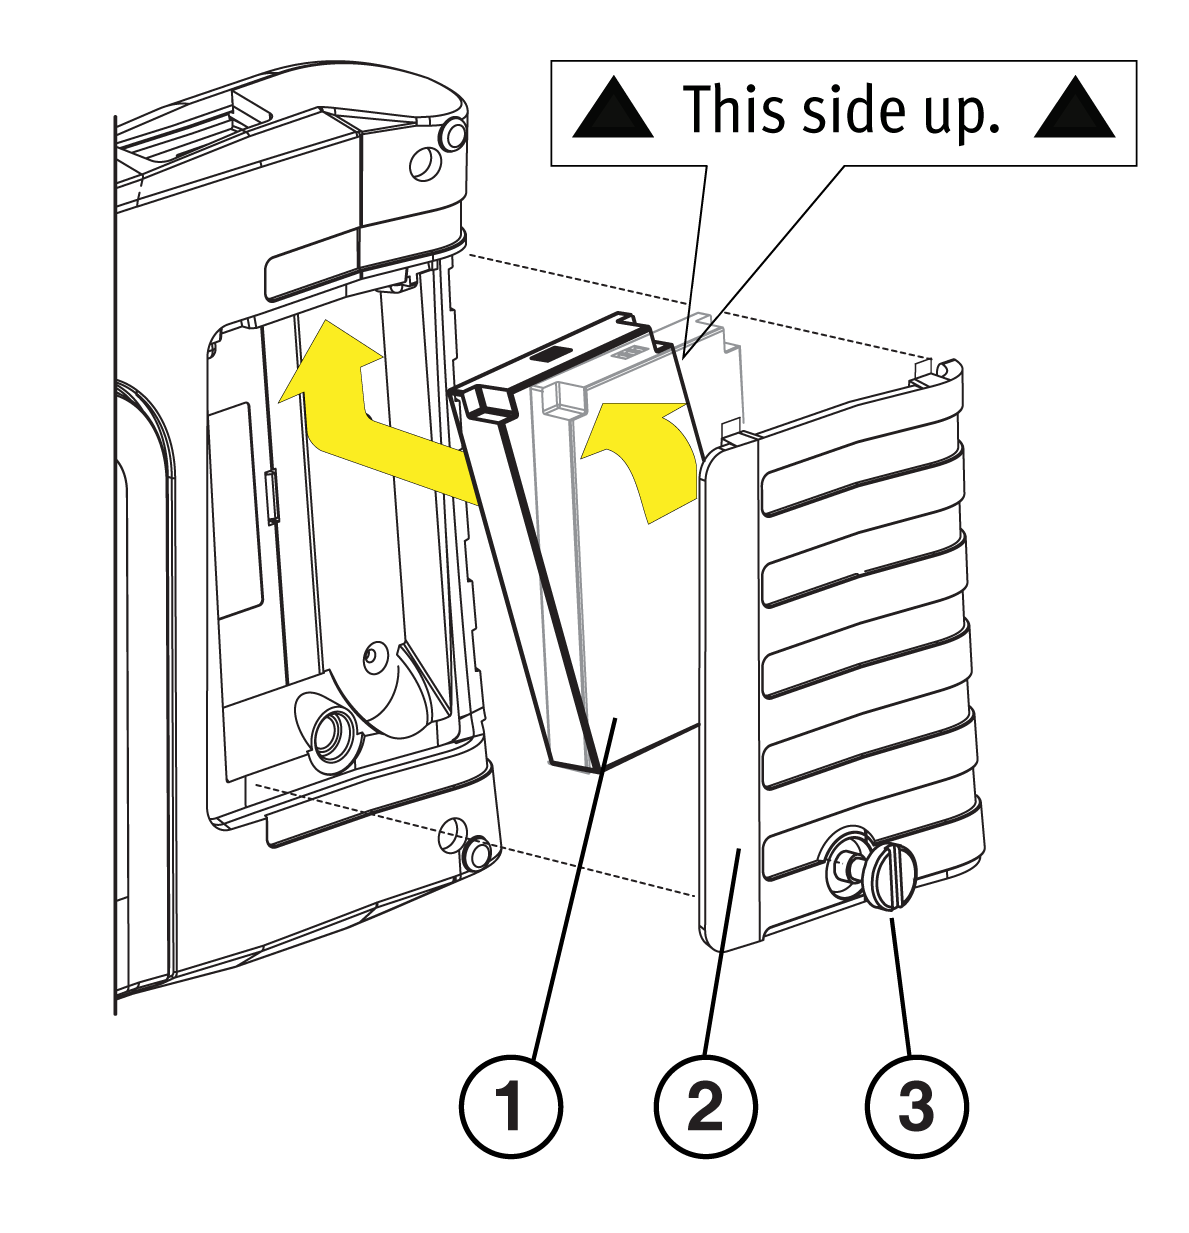
| 1. | Position the battery pack as shown below with the arrows facing up. |
| 2. | Tilt the top of the battery in to align the tabs, then down to install into place. |
| 3. | Install the battery pack cover, in the opposite manner as removal, aligning the tabs and tilting down and in, into place. |
| 4. | Tighten the battery cover screw |
| 1. | Battery Pack |
| 2. | Cover |
| 3. | Cover Screw |
The diagnostic tool can be powered from the internal rechargeable battery pack. A fully charged battery pack provides sufficient power for about 3 hours of continuous operation.
Battery charging occurs whenever the data cable is connected to a vehicle DLC. Battery charging also occurs when the AC power supply is connected to a live AC power source, and connected to the diagnostic tool. Use the supplied AC power supply to charge the battery pack.
Insert the end of the AC power supply cable into the diagnostic too power supply jack, then connect the AC power supply to an approved AC power source.
Only use the supplied AC power supply. Never connect the power supply to the diagnostic tool when the tool is communicating with a vehicle.
The Battery Status Indicator LED (located next to the power supply jack) indicates battery status.
|
Battery Status LED (Top of Tool) |
|
|
|
Green - Fully charged / power supplied by the AC power supply. |
|
|
Red - Charging |
|
|
Amber - Fault Mode, battery temperature above 104°F/40°C. Allow the tool and battery to cool down before continuing operation. |
|
Battery Charge Status Indicator (Title Bar) |
|
|
|
Full Battery Charge Level - Indicates power is being supplied by the internal battery pack. Horizontal bars diminish as the battery discharges. |
|
|
Low Battery Charge Level - Indicates the internal battery pack is low and needs to be recharged immediately. A warning message will also display on the screen when the battery gets low. |
|
|
External Power Connected - Indicates power is being supplied through the data cable connection to a vehicle or by the AC Power Supply and charging the battery pack. |
If the battery pack needs to be replaced, contact your sales representative to order a new battery pack.
Only use the manufacturer recommended original equipment replacement battery pack.
Always dispose of the battery pack according to local regulations, which vary for different countries and regions. The battery pack, while non-hazardous waste, does contain recyclable materials. If shipping is required, ship the battery pack to a recycling facility in accordance with local, national, and international regulations.
Always dispose of materials according to local regulations.
For additional information contact:
Australian Battery Recycling Initiative http://www.batteryrecycling.org.au7
Products bearing the WEEE logo are subject to European Union regulations.


