To display secondary ignition waveforms the Lab Scope must be properly configured to the type of ignition system you are testing, and for the type of display pattern you wish to view. For general reference information on ignition waveforms, see Ignition Waveform Reference .
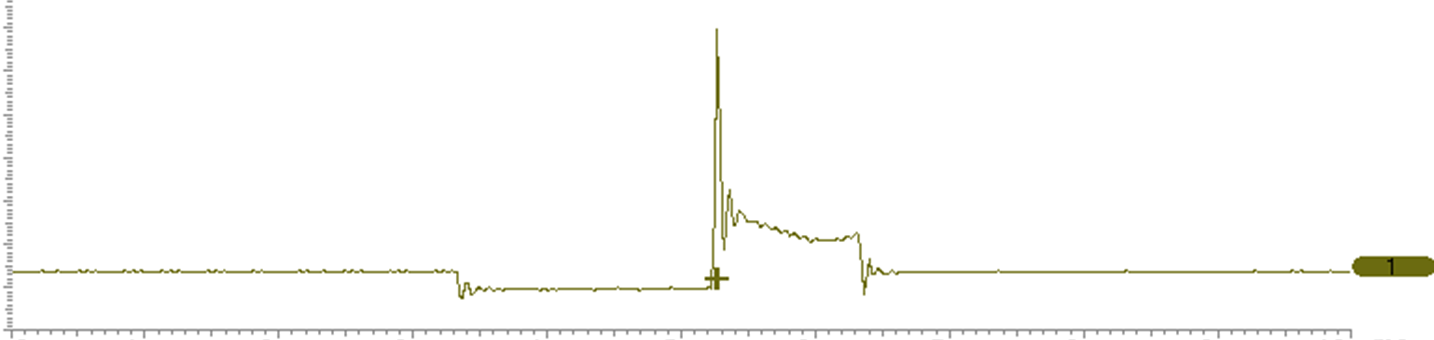
Typical Secondary Ignition Signal
| 1. | To start the setup process, select Scope Multimeter from the Home screen. |
| 2. | Select Ignition Scope. |
| 3. | Choose one of the following test modes: |
| – | Parade - displays the secondary waveform pattern for each cylinder in the firing order from left to right across the screen. |
| – | Cylinder - displays the secondary waveform pattern for the selected cylinder. |
| – | Raster - displays the secondary waveform pattern for each cylinder in the firing order, from the bottom to the top across the screen. |
| – | Superimposed - displays the secondary waveform pattern for each cylinder in the firing order stacked on top of each other. |
| – | Single Cylinder Ignition - configures the unit to connect to an individual cylinder using a fixed time sweep when a lead is not available to connect to all cylinders. |
| 4. | Select Setup from the upper toolbar. |
The Ignition Scope Preferences menu opens. From this menu and the sub-menus within it, you can configure all the settings needed to display secondary ignition pattens.
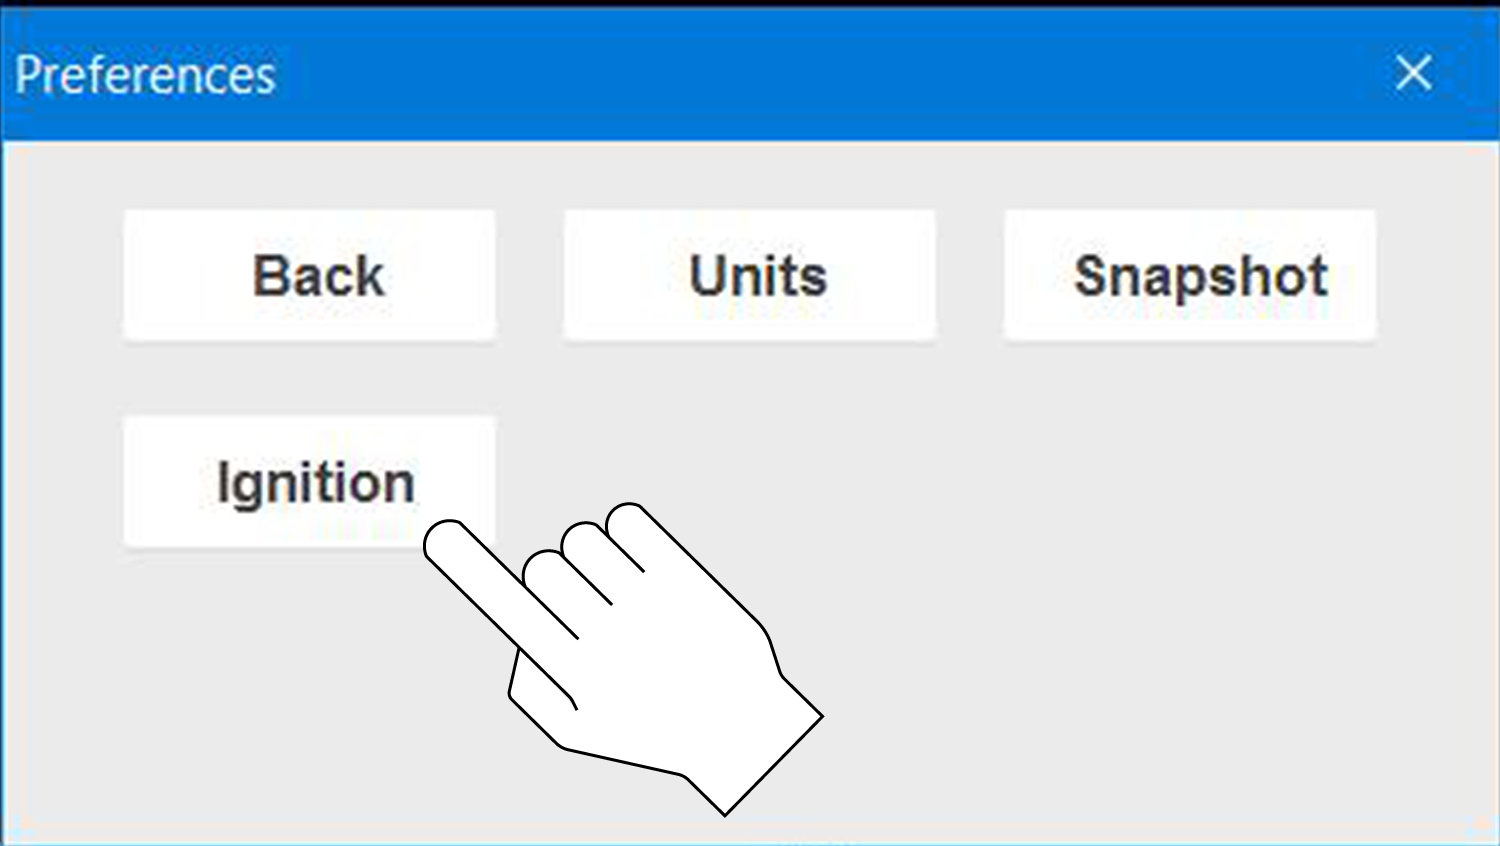
| 5. | From the Preferences menu select Setup . |

| 6. | From the sub-menu select Ignition . |
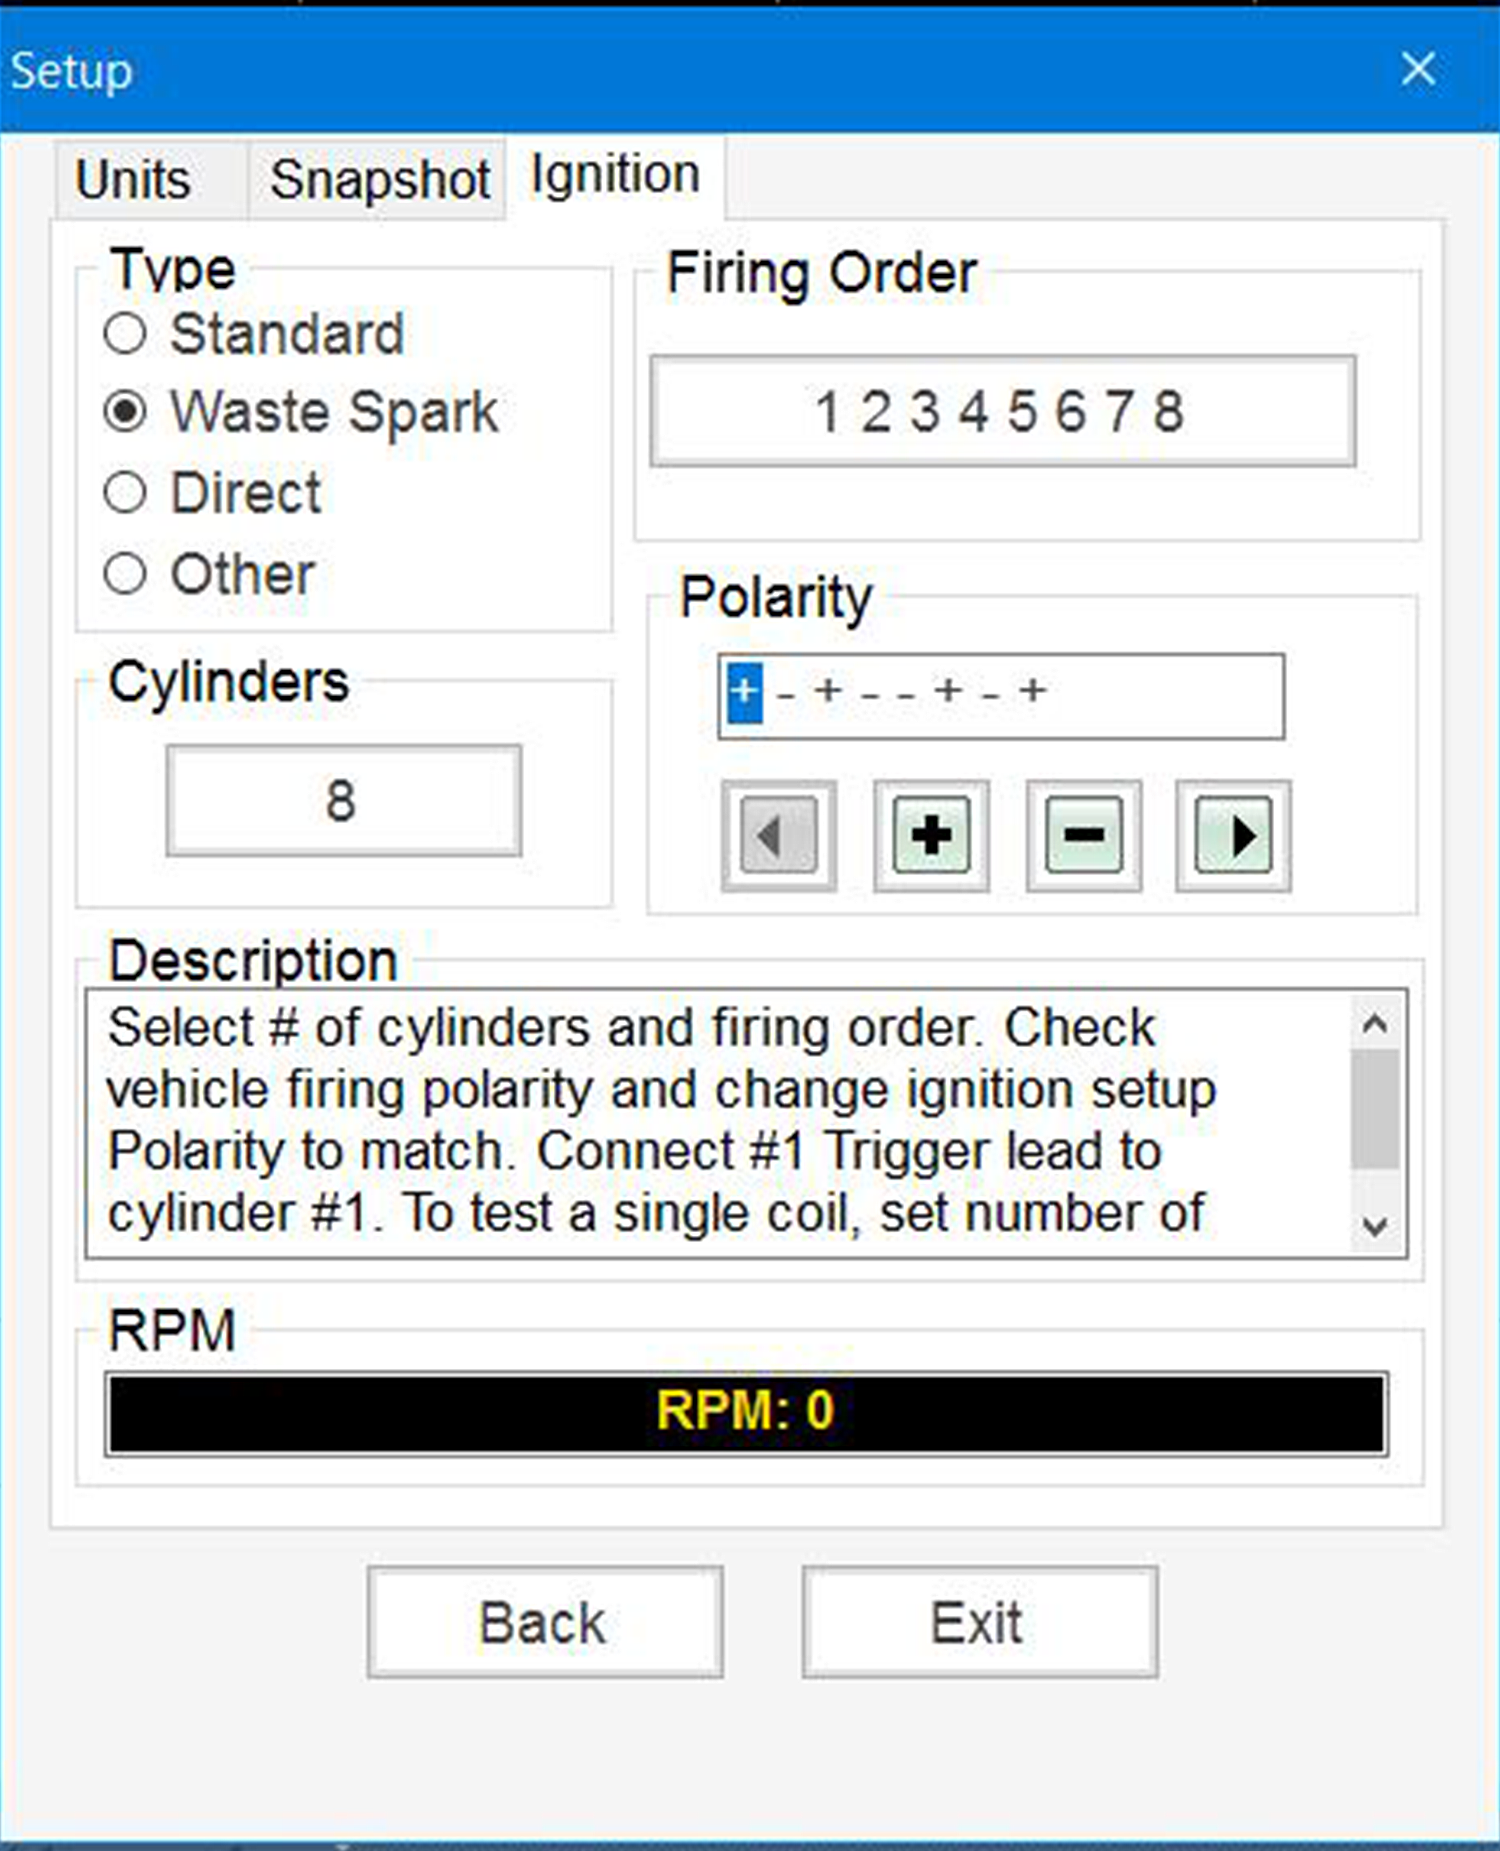
The main ignition setup menu opens.
| 7. | Choose an ignition system Type, there are four types of ignition system choices available. |
The basic setup of each Type, are described in the following sections.
It is important that you choose the ignition system type first, as other settings are dependent on this selection.
Standard is used for ignition systems with a distributor.
| 1. | Enter the Number of Cylinders. |
| 2. | Select the Firing Order. |
| 3. | Select Plug for Number 1 Trigger setting. |
Setup Notes:
| – | Selecting Coil (for Number 1 Trigger setting) should only be used to supply an RPM signal when the #1 trigger lead is connected to the coil wire. |
| – | Connect the #1 trigger lead to cylinder #1. |
| 4. | Refer to the following sections for additional ignition scope settings: |
| – | Traces (Ignition Scope Trace Setup) |
| – | Sweep (Ignition Scope Sweep Setup) |
| – | Trigger (Ignition Scope) |
For common settings within the Preferences menu, see Setup Menu (Preferences).

Waste Spark is used for coil pack systems that fire two plugs simultaneously.
| 1. | Enter the Number of Cylinders. |
| 2. | Select the Firing Order. |
| 3. | Check the engine firing polarity and change the Polarity setting to match it by using the + and - buttons. |
Setup Notes:
| – | Connect the #1 trigger lead to cylinder #1. |
| – | To test a single coil, set the number of cylinders to 2. |
| – | When testing Wasted Spark systems, power firings will display on Channel One and waste firings on Channel Two. |
| 4. | Refer to the following sections for additional ignition scope settings: |
| – | Traces (Ignition Scope Trace Setup) |
| – | Sweep (Ignition Scope Sweep Setup) |
| – | Trigger (Ignition Scope) |
For common settings within the Preferences menu, see Setup Menu (Preferences).
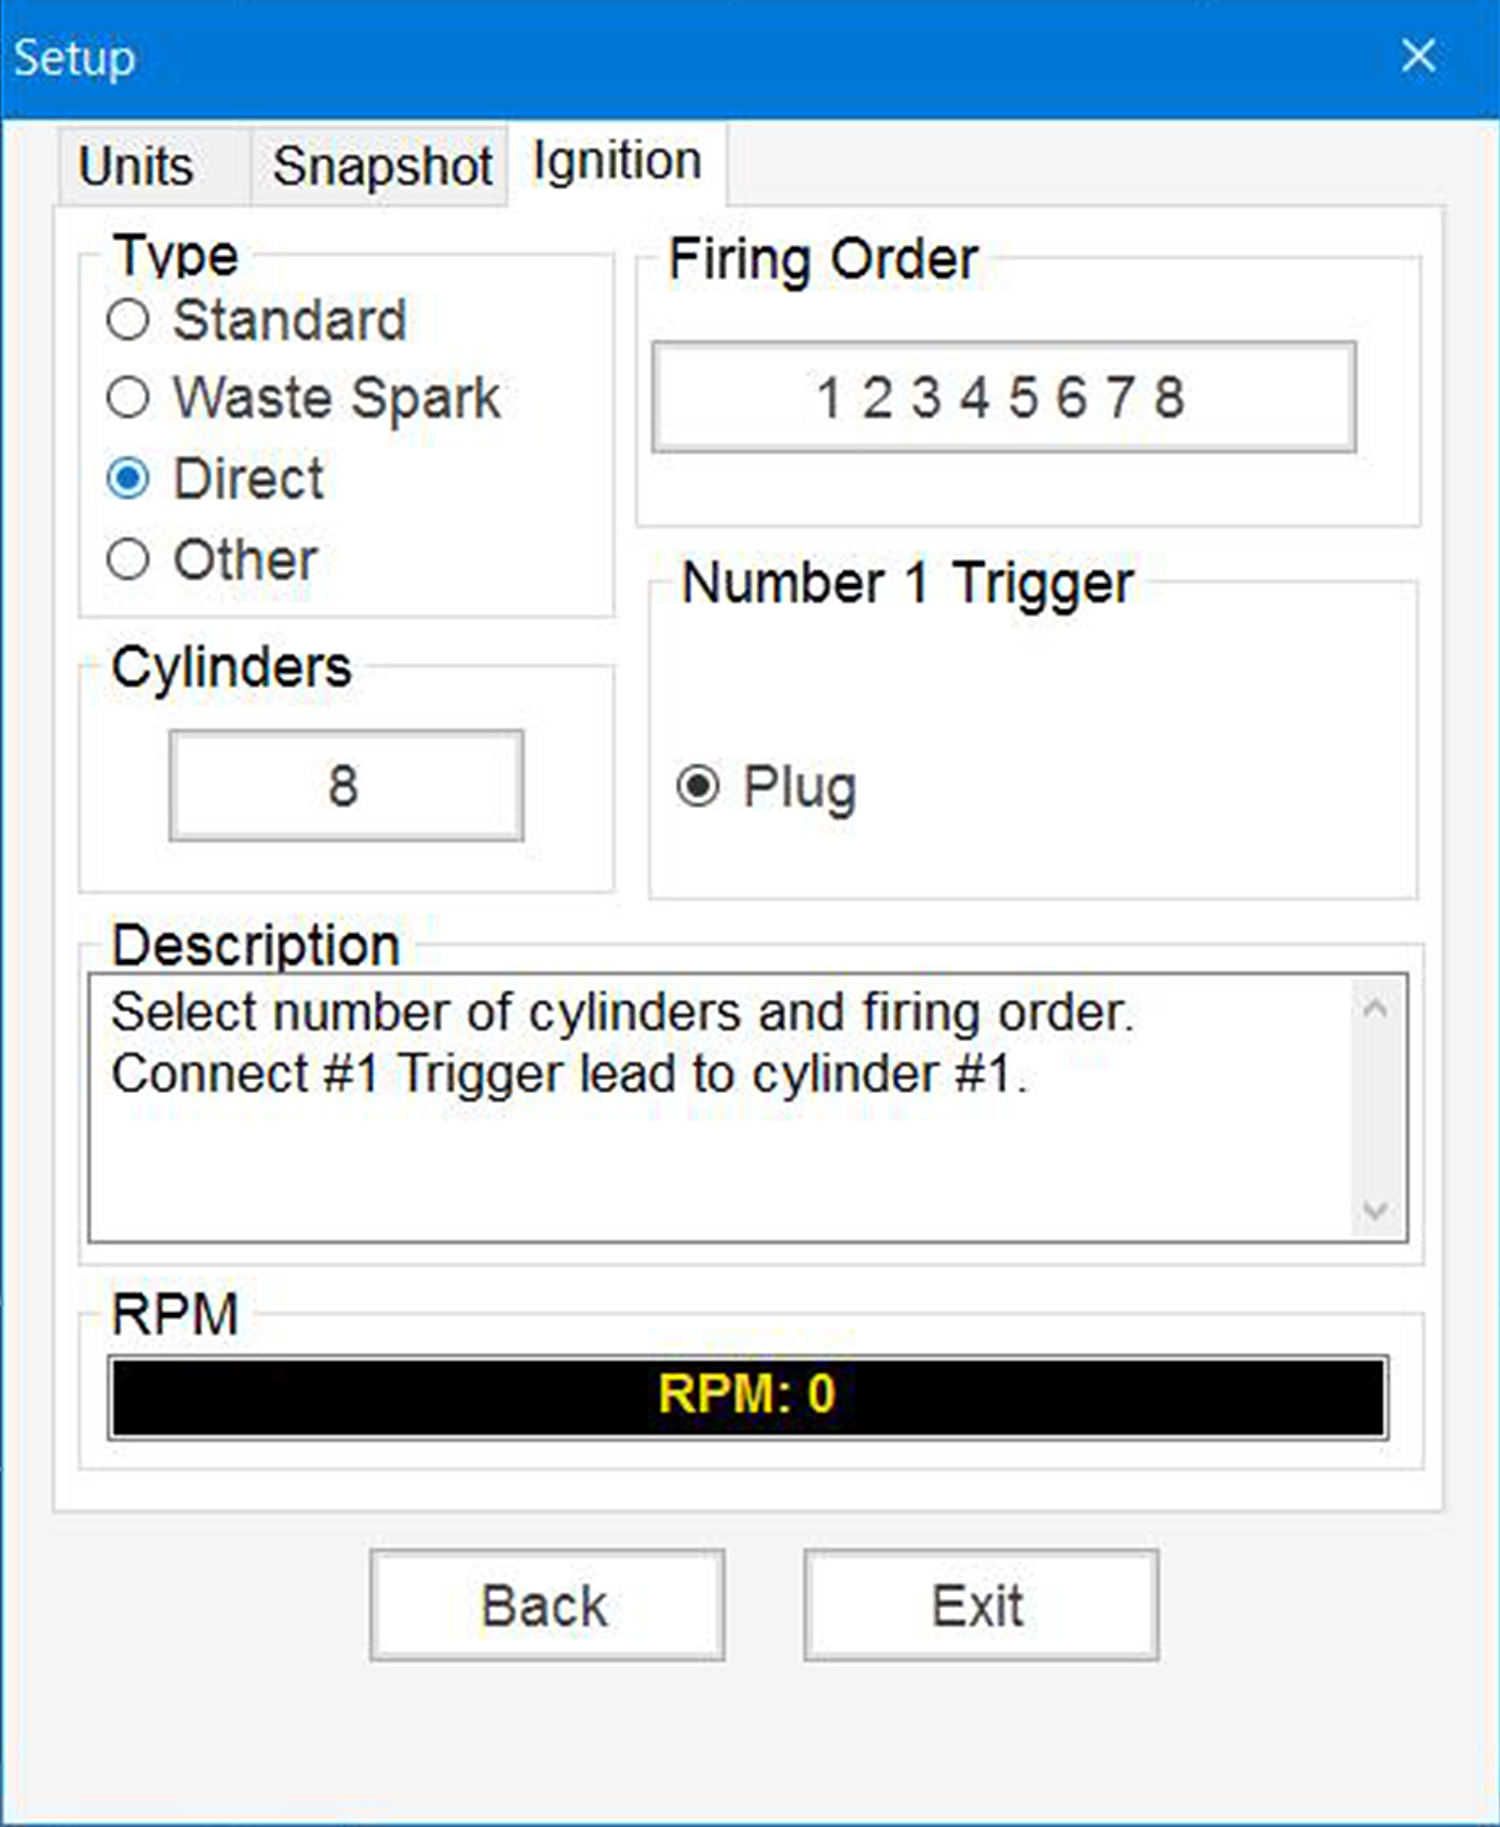
Direct is used for coil-on-plug systems.
| 1. | Enter the Number of Cylinders. |
| 2. | Select the Firing Order. |
Setup Notes:
| – | Plug is preset as the setting for Number 1 Trigger setting. |
| – | Connect the #1 trigger lead to cylinder #1. (For vehicles without a plug wire, this connection may not be possible. As an alternate method that may work, try clamping around the #1 cylinder primary coil driver wire or all primary wires if they are tightly bundled.) |
| 3. | Refer to the following sections for additional ignition scope settings: |
| – | Traces (Ignition Scope Trace Setup) |
| – | Sweep (Ignition Scope Sweep Setup) |
| – | Trigger (Ignition Scope) |
For common settings within the Preferences menu, see Setup Menu (Preferences).
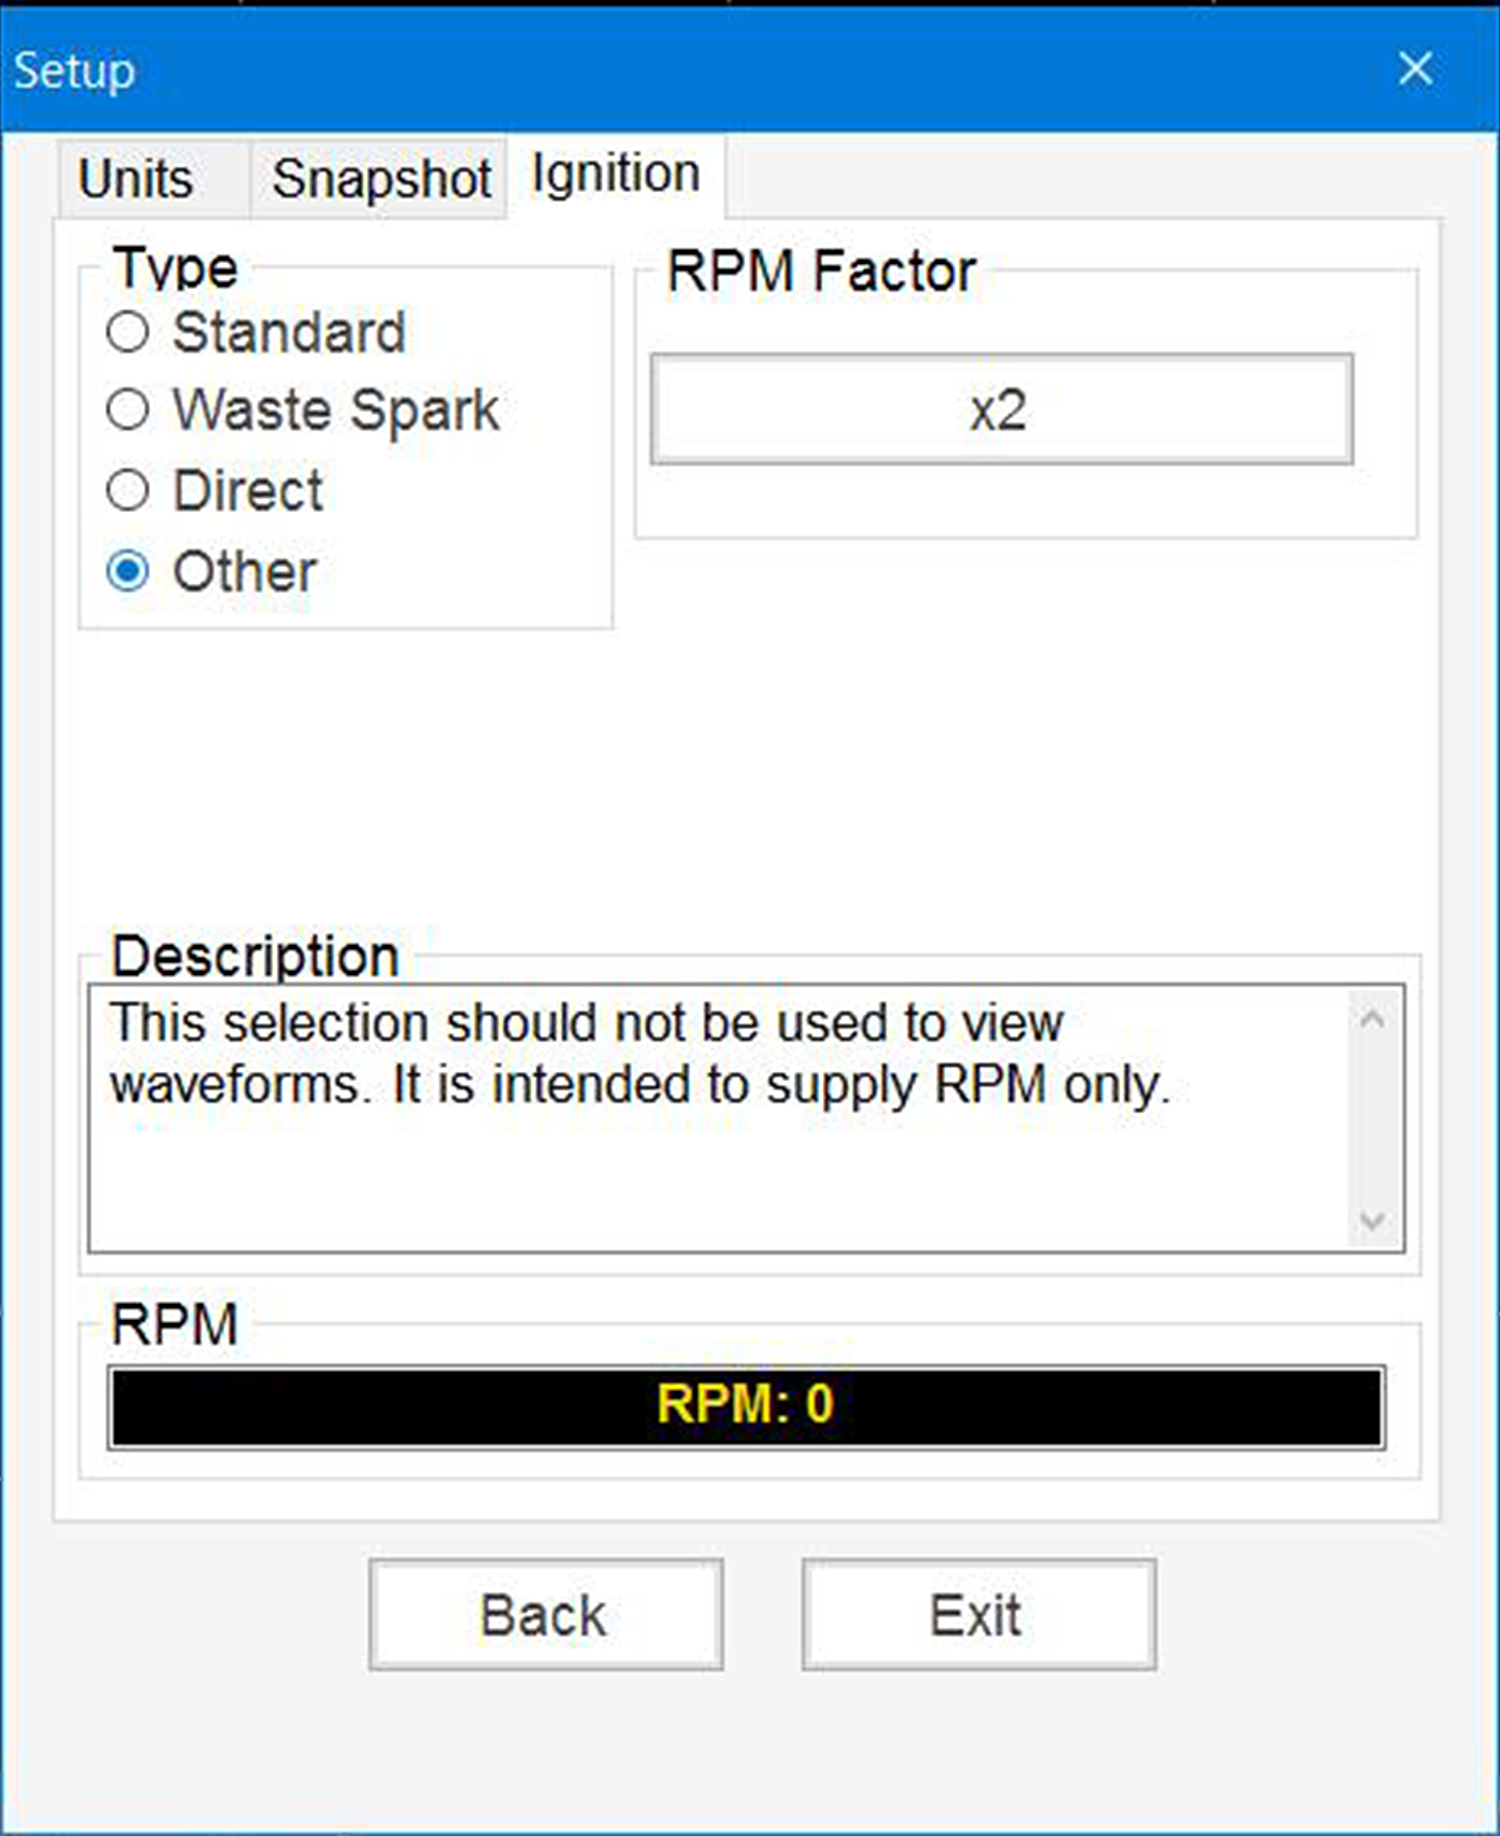
Other is used for ignition systems that do not fit any of the other categories (e.g rotary engine).
This selection should not be used to view waveforms. It is only used to supply an RPM signal.
Select the applicable RPM factor.
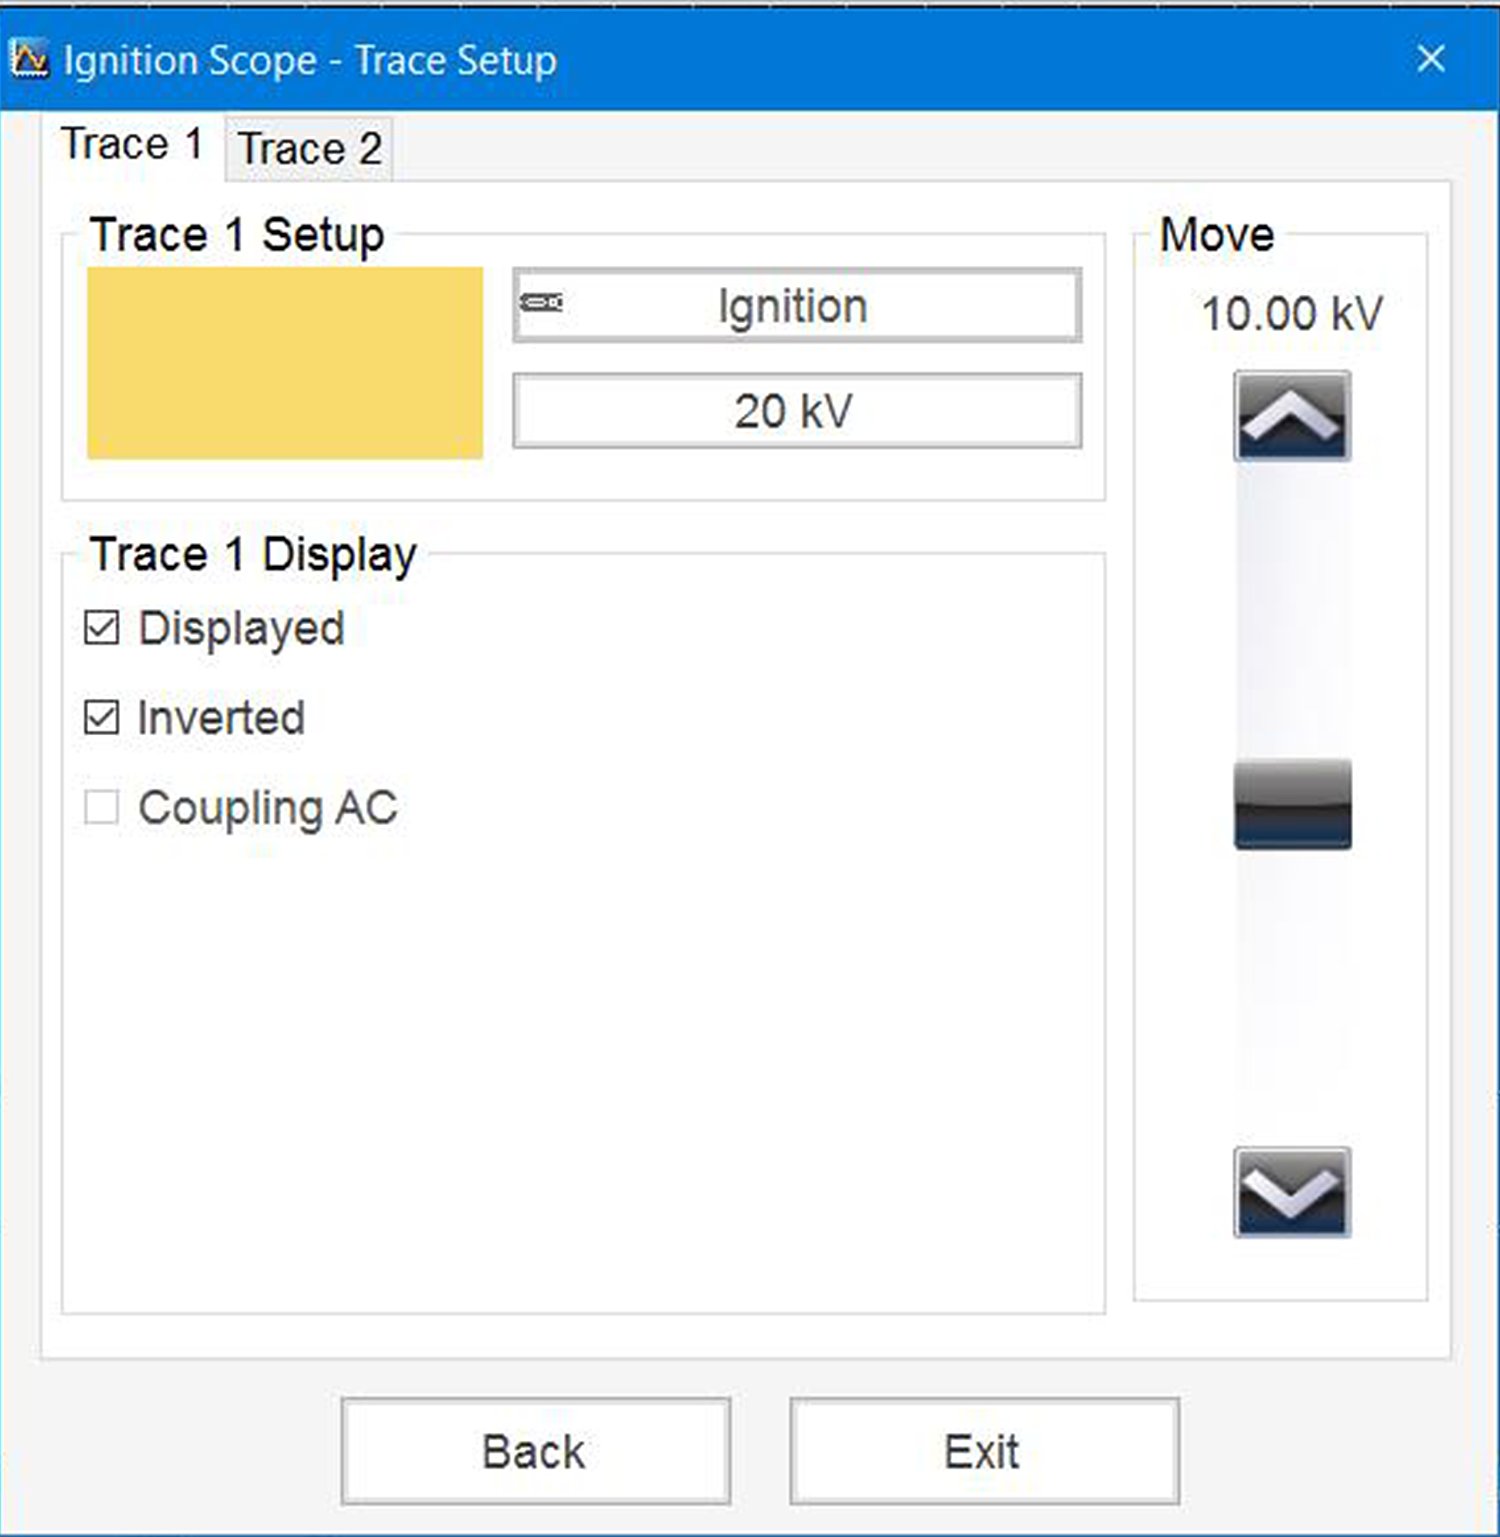
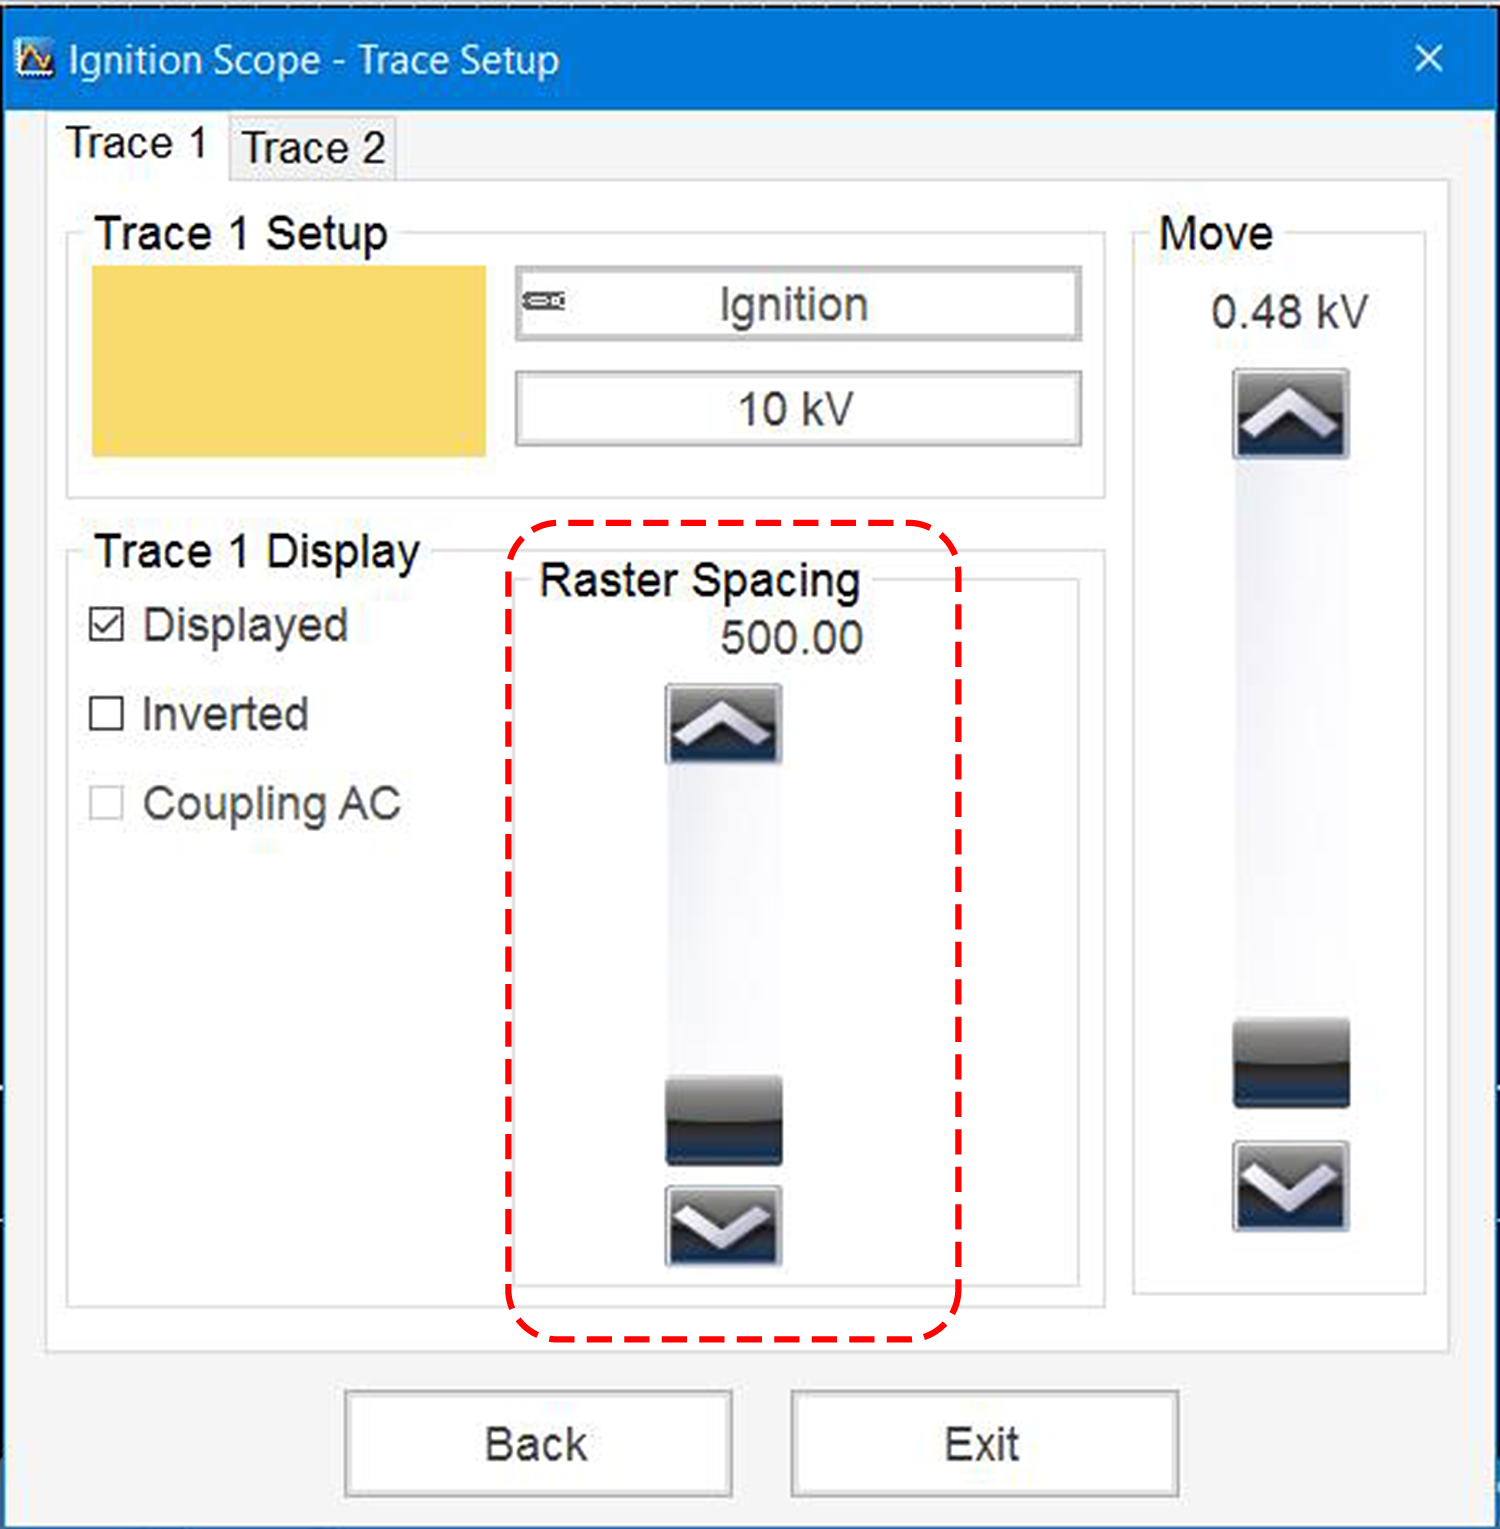
Trace Setup allows you to:
| – | Change the KV scale |
| – | Display or hide the trace |
| – | Invert the trace |
| – | Turn on/off Coupling AC (only selectable if a “time” based sweep is used) |
| – | Move the Zero Base line using the slider (right side) |
Setup Notes:
| – | Trace 2 is only active when in Wasted Spark Mode |
| – | Raster Spacing adjustment is only available in Raster mode. |
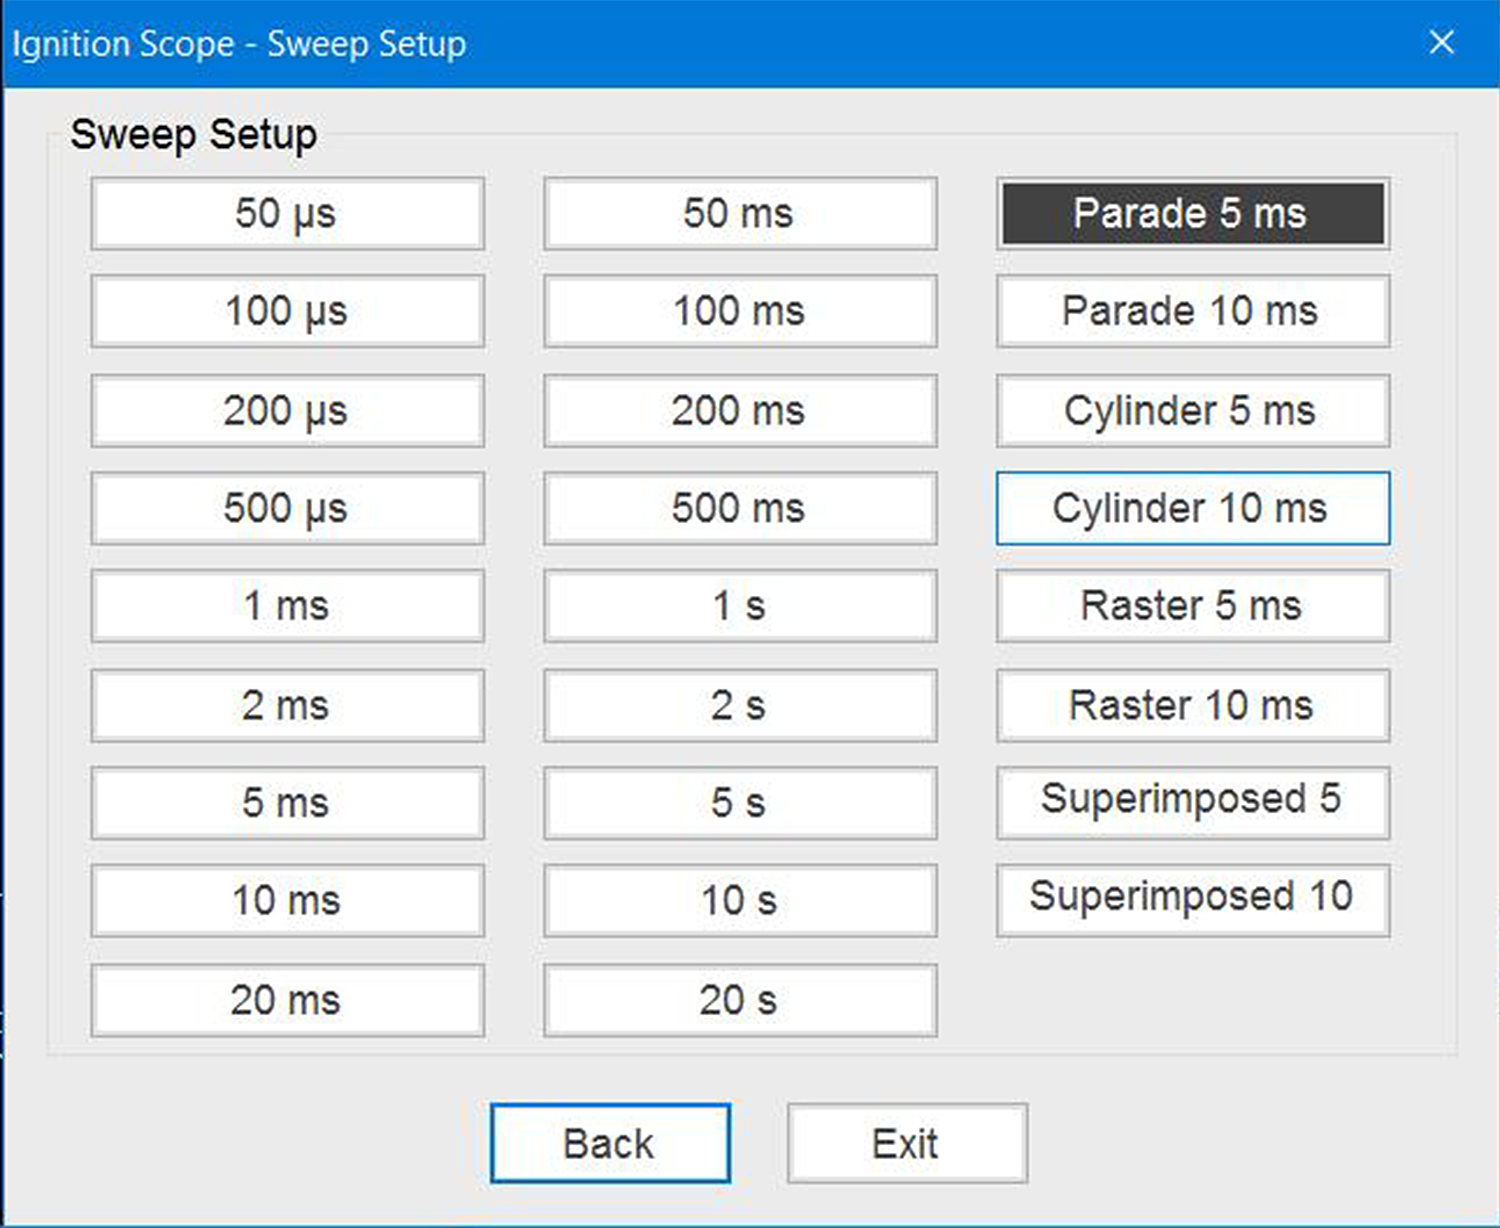
Sweep Setup allows you to change the ignition test mode, or change to a time based sweep setting (e.g. 2 ms, 50 ms, 5s).
Two variations of each ignition test mode (5 and 10ms) are offered (e.g. Raster 5 ms and Raster 10 ms).
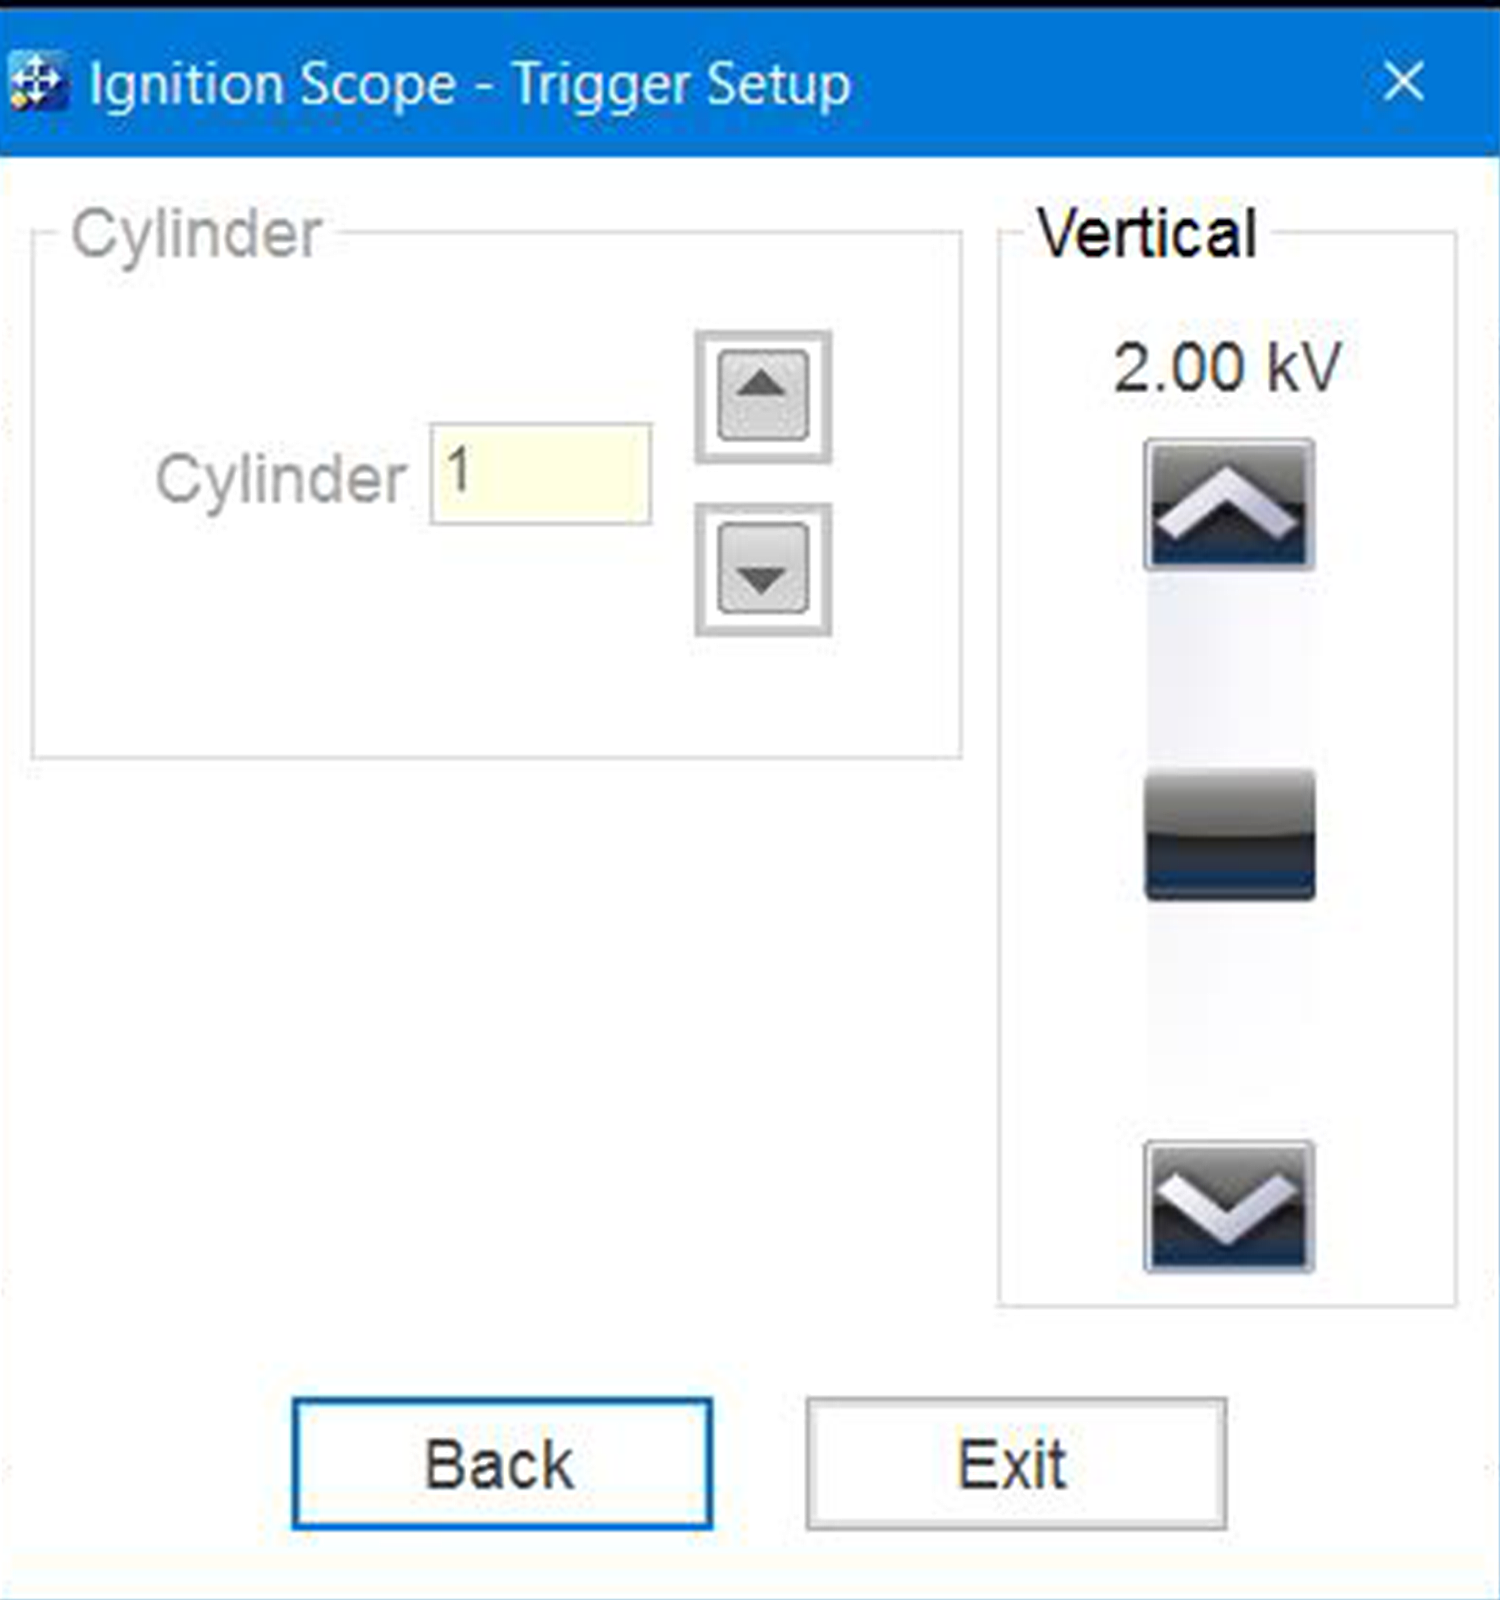
Trigger Setup allows you to:
| – | Change the triggered cylinder (Single Cylinder Mode only) |
| – | Adjust the detection sensitivity to cylinder firings |
About Detection Sensitivity
The sensitivity adjustment is primarily used to fine tune the ignition signal into a viewable pattern. The “Vertical” slider is used to raise or lower the cylinder firing detection sensitivity. Adjusting the sensitivity can be useful when:
- When the scope is intermittently detecting cylinder firings. If this occurs,
lower the setting to achieve a viewable pattern.
- When the scope is detecting noise or other events. If this occurs, raise the
settings to achieve a viewable pattern.
It is important to note that detection sensitivity does not function like a standard scope trigger that triggers at a set level. Adjusting the sensitivity high (10-20kv), assuming it will trigger at the firing kV and display a pattern is incorrect.
The sensitivity setting is designed to detect and adjust the viewable pattern of an ignition waveform. A good starting point for most systems is 2.0 kV,, however this can vary depending on the pickup. In most cases, start at the average spark kV of the system (typically 2 kV) and then make adjustments (high/low) as needed to find and display a viewable pattern. The following general rules of operation apply:
Higher = less sensitive
Lower = more sensitive
Setup Notes
| - | With Wasted Spark ignition systems, the sensitivity level setting only displays on Channel 1, but the setting applies to both channels. |
| - | Unless you are having problems detecting cylinders, a sensitivity setting of 2.0 kV is optimal for most ignition systems. |
| - | When a cylinder firing is not detected because it is either firing too low to be detected at the current setting or is not firing at all, a blank space displays in the on-screen pattern. To verify a missed cylinder firing, lower the sensitivity setting to verify that the cylinder is firing, but firing too low to be detected at the current sensitivity setting. If a cylinder is not firing at all, the blank space on the graph will remain. |
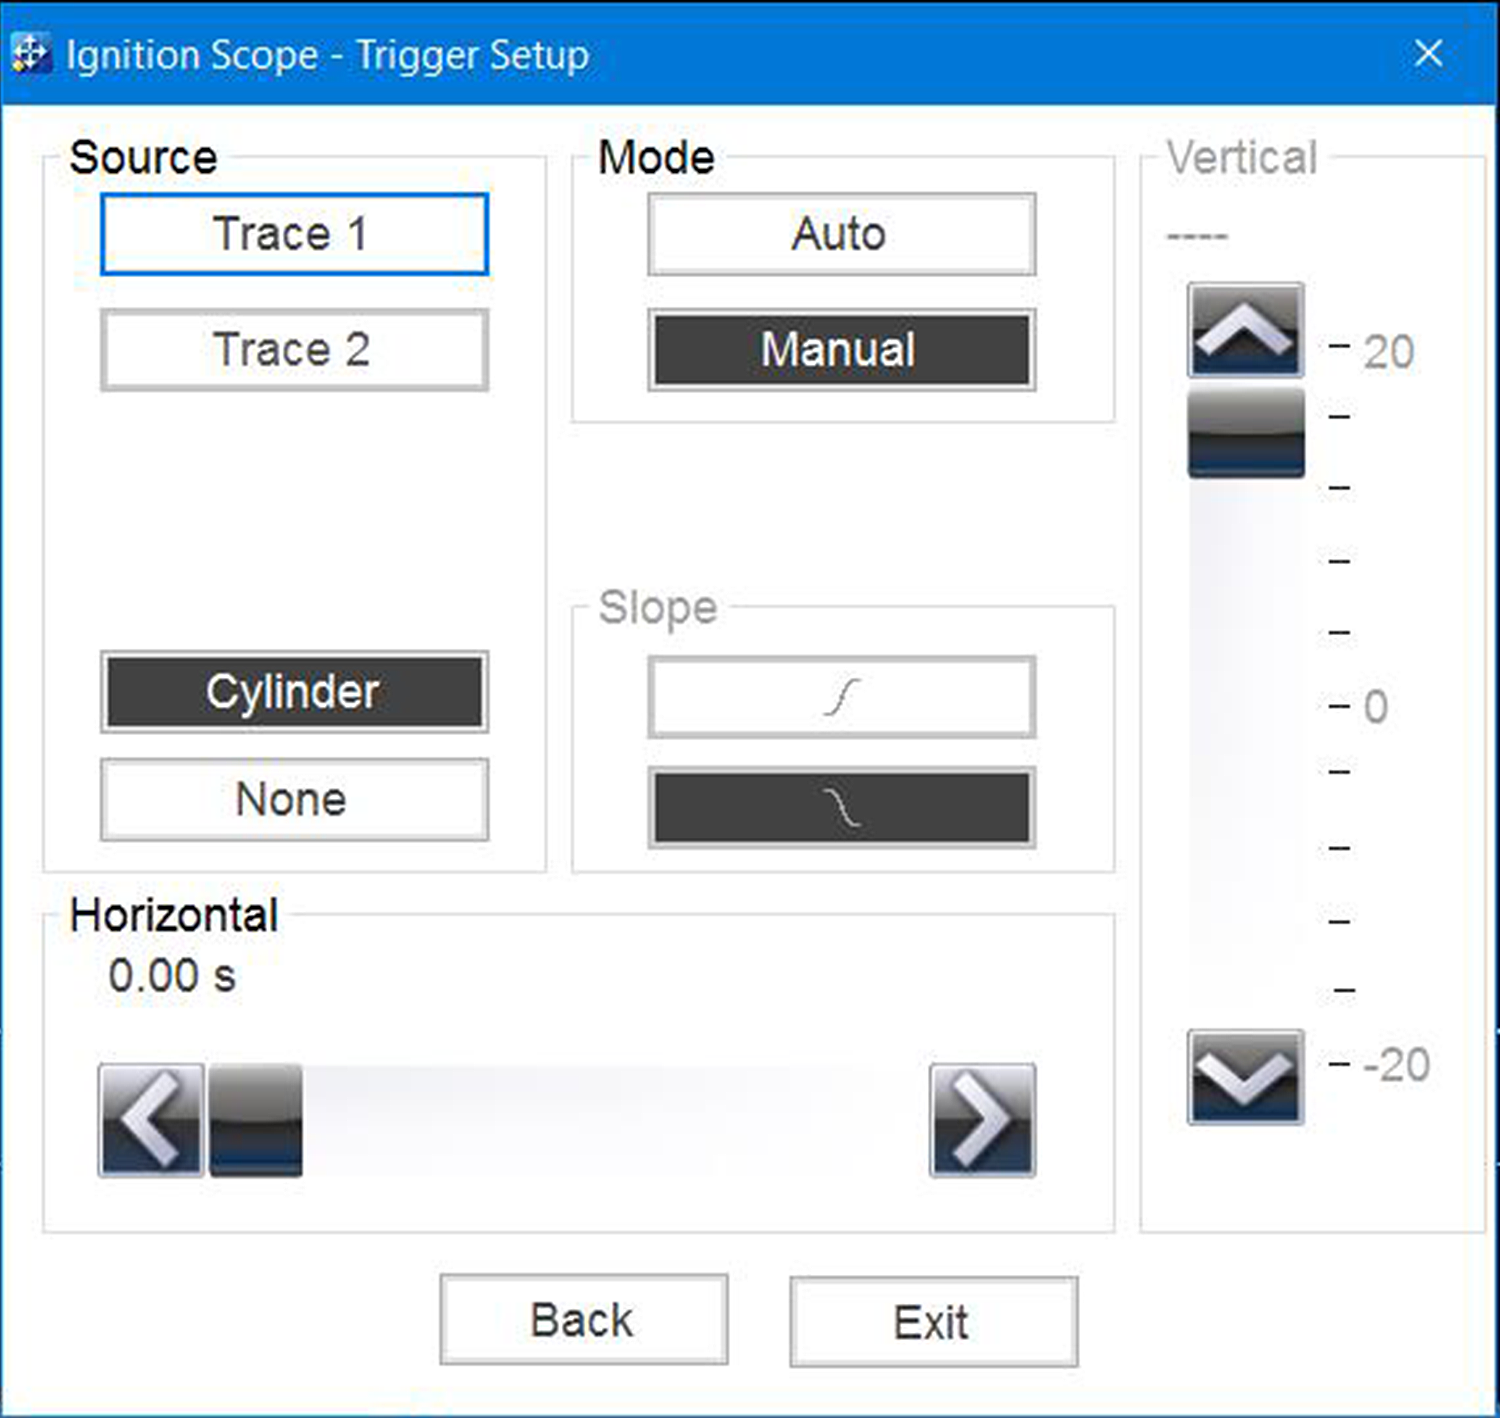
If using a time based sweep setting, the Trigger Setup allows you to:
| – | Change Auto / Manual trigger mode |
| – | Trigger from a Cylinder or None |
| – | Adjust the trigger vertically on the KV scale using the slider (right side) |
| – | Adjust the trigger horizontally on the sweep scale using the slider (bottom) |
To display secondary ignition waveforms, optional secondary ignition coil adapter(s) and a coil adapter lead assembly are required.
Visit https://diagnostics.snapon.com for more information on ignition test leads and adapters that are applicable with your diagnostic tool, and/or contact your sales representative.
The optional secondary ignition adapter lead is required for Ignition Scope testing and can be used with the secondary ignition clip-on wire adapter, coil-in-cap (CIC), or coil-on-plug (COP) secondary ignition adapters to display secondary ignition signals.

Secondary Ignition Coil Adapter Lead
Connecting the Secondary Ignition Adapter Lead
| 1. | Connect the black right-angle stackable ground lead into the diagnostic tool ground jack. |
| 2. | Connect the yellow lead into the diagnostic tool channel 1 jack. |
| 3. | Connect the adapter lead ground clamp to vehicle ground. If a jumper wire is used to extend the length of the adapter lead ground clamp lead, keep it as short as possible. |
| 4. | Connect the adapter lead RCA plug into the secondary ignition Clip-on or COP/CIC Ignition Adapter as needed. |
| 5. | Clamp the secondary clip-on adapter (see below (Secondary Ignition Clip-on Wire Adapter) over a spark plug or coil lead, or attach the applicable COP/CIC coil adapter to the vehicle ignition coil. |
| 6. | Isolate the leads from other components to avoid any unwanted noise that may be induced into the signal. |


The optional Inductive RPM Pickup adapter connects to the DB9F connector on the diagnostic tool, and is used as an external trigger for the ignition scope, and is also used for RPM calculations (which may be displayed onscreen).
The signal from this adapter it is not displayed on a channel. The primary purpose of this adapter is to synchronize the scope to #1 cylinder (if connected to #1) in order for the scope to display the cylinders in the correct position on the screen.
Vehicle specific and universal secondary ignition adapters are available as optional equipment. These adapters attach to the secondary ignition coil in order to pick up the secondary ignition signal.
Universal stick and flag type adapters - are positioned next to or on a secondary ignition coil.
| ● | General purpose single flag pick-up. |
| ● | General purpose stick pick-up. |
Vehicle specific Clip-on adapters are directly attached to (or next to) a secondary ignition coil (COP type) or to a distributor cap (CIC type). Secondary ignition coil-on-plug (COP) and coil-in-cap (CIC) adapters are available for universal and engine specific applications. All the adapters listed are available individually.
| ● | OEM specific COP adapters: |
| – | Ford (COP-1) |
| – | Chrysler (COP-2) |
| – | VW/Audi (COP-3) |
| – | Acura/Honda/Isuzu (COP-4) |
| – | Volvo/BMW (COP-5) |
| – | Mercedes-Benz (COP-6) |
| – | Mercedes-Benz Dual Type (COP-7) |
| – | BMW (COP-8) |
| – | Lexus (COP-9) |
| – | Chrysler/Jeep/Lexus/Toyota (COP-11) |
| ● | OEM specific CIC adapters: |
| – | GM HEI (CIC-1) |
| – | Toyota/Honda (CIC-2) |
Setup Notes:
When using COP/CIP adapters, check the Presets menu for existing scope COP/CIP presets to save time setting up the scope. See Presets.
The primary use for the optional SIA 2000 Adapter Kit is to connect to multiple cylinders at once on Wasted Spark distributorless ignition systems.
A separate user manual is available for the SIA 2000 Distributorless Ignition System Adapter
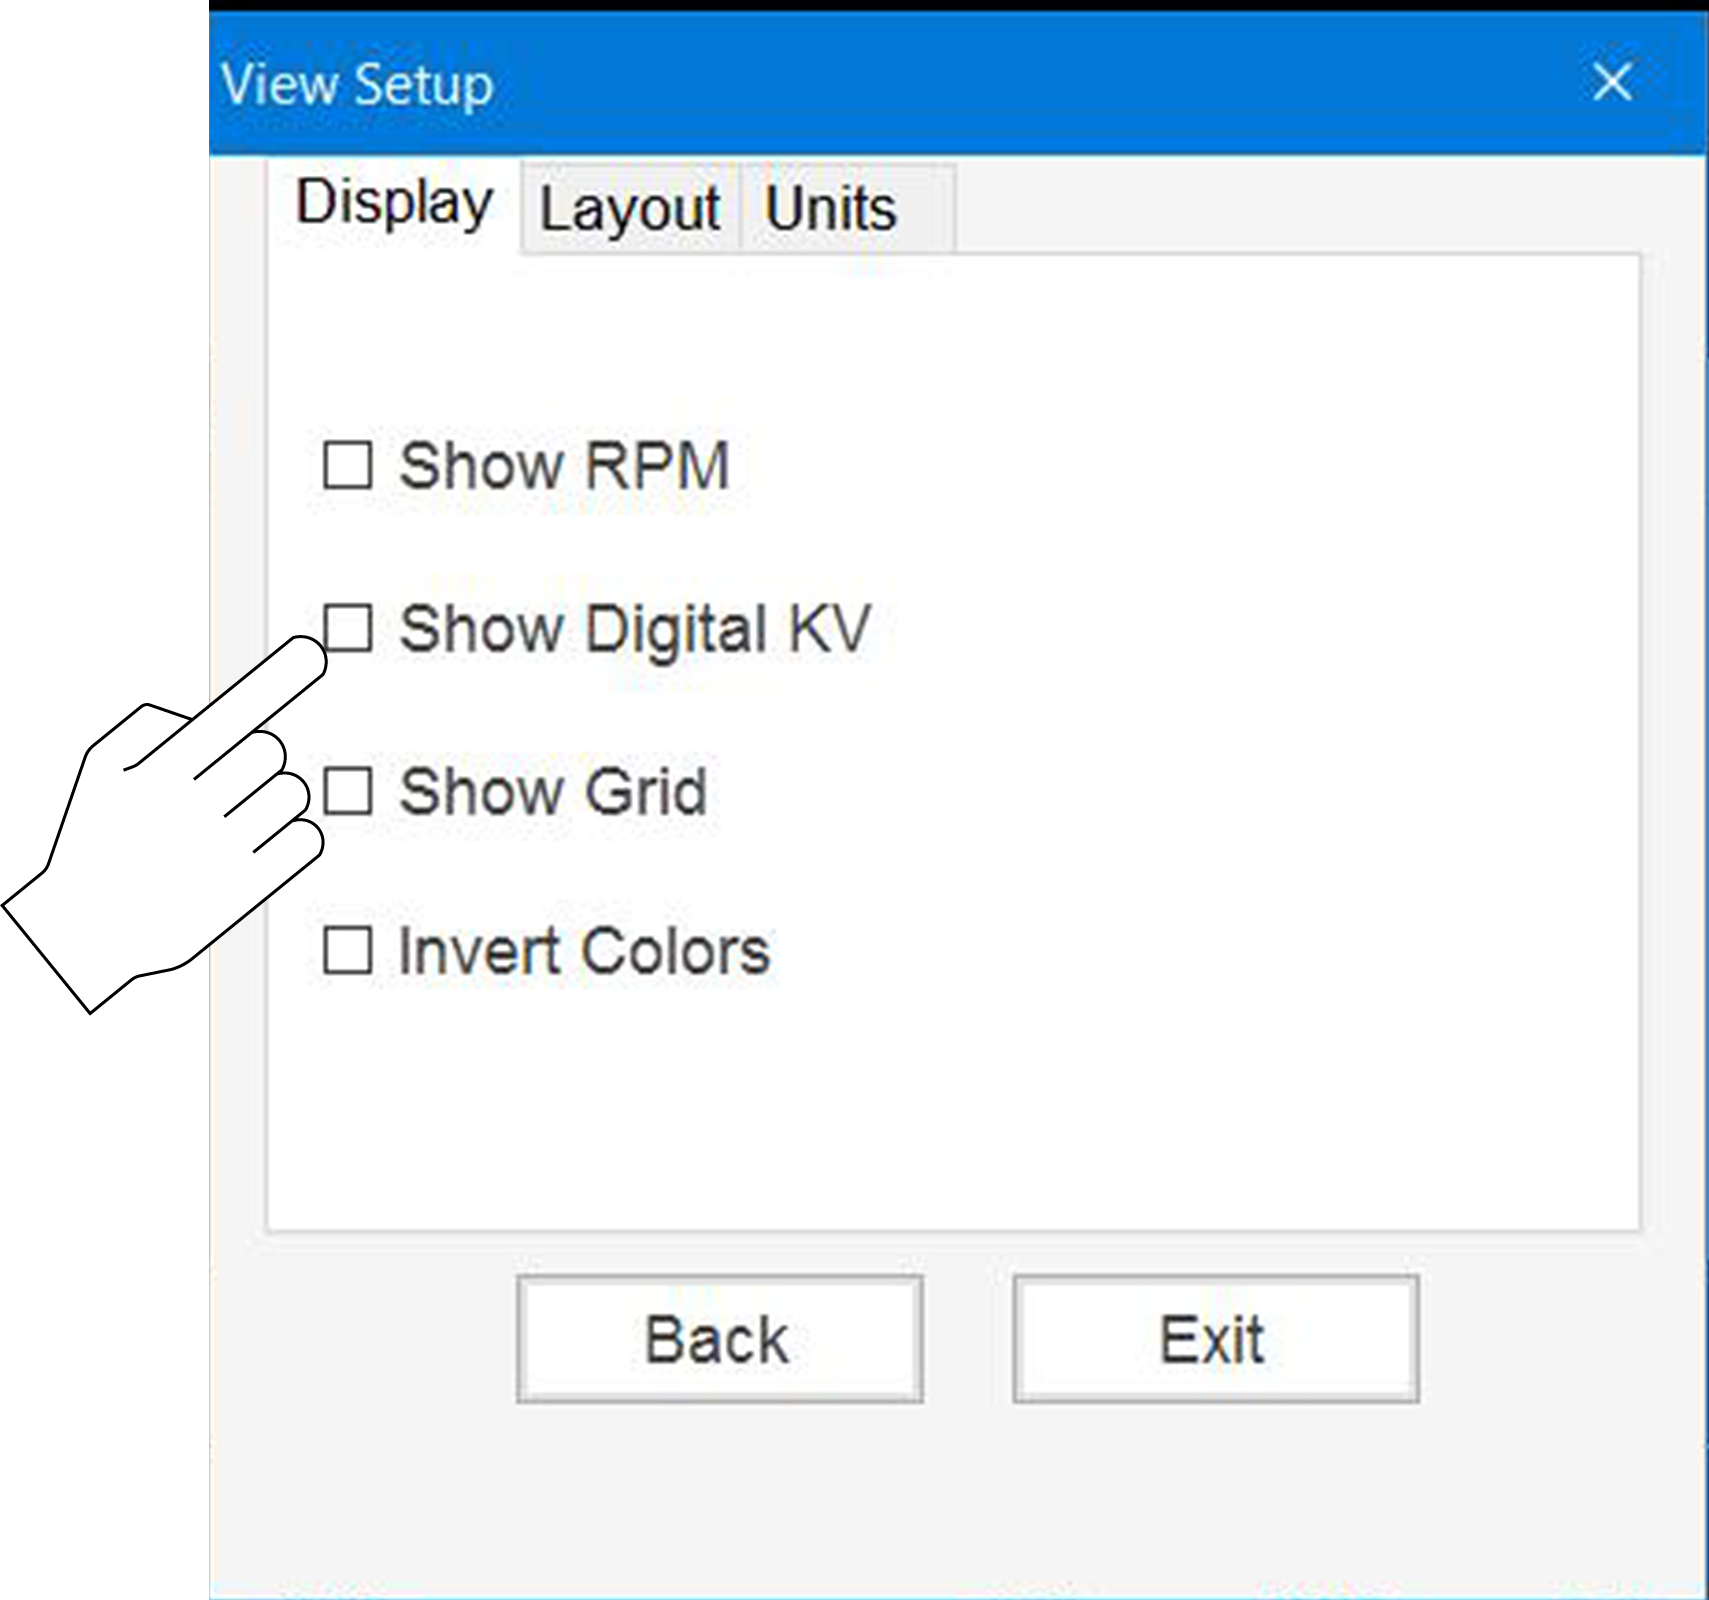
Digital kV displays digital kilovolt readings, rather than waveforms, on the screen . Viewing all kV values on one screen can be useful when trying to find an intermittent problem.

Sample Show Digital KV selected
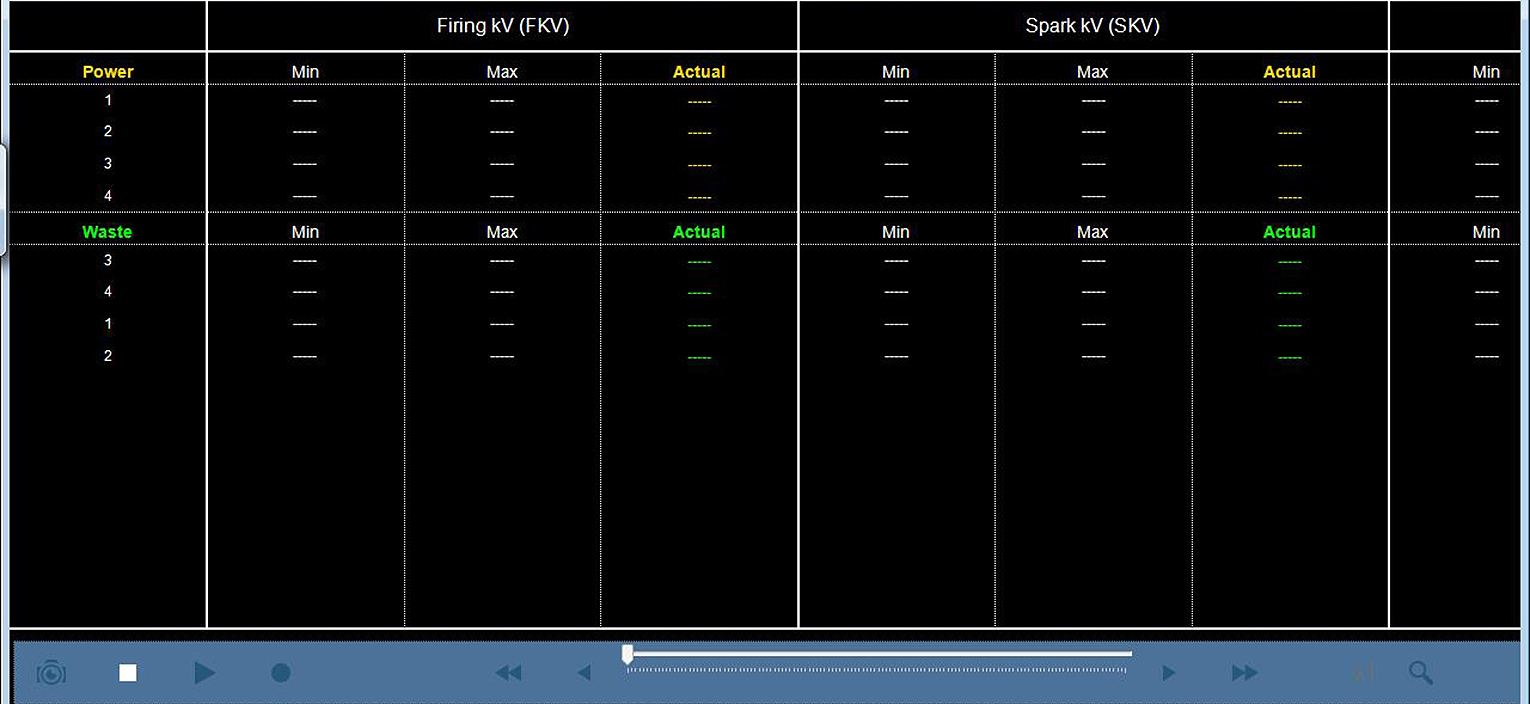
Sample Show Digital KV selected
To open the Digital kV View, select Setup from the upper toolbar, then from the menu select View > Display > Show Digital kV.
This feature displays the digital kV readings corresponding to the selected channel, and provides another way to monitor the secondary ignition system. When testing wasted spark ignition systems, power firings display on channel one and waste firings display on channel two.
The digital values are only as good as the source signal. If there is a problem with the connections or setup and a stable waveform is not displayed, the digital value may not be calculated correctly. If problems are experienced with the digital values, check lead connections and setup settings. If a measurement cannot be calculated, dashes display in place of values.
Firing kV, Spark kV, and Spark Duration (burn) measurements are calculated from the secondary waveform.
| ● | Firing kV (FKV)—voltage required to overcome the rotor and spark plug gaps and establish a spark across the spark plug electrodes. |
| ● | Spark kV (SKV)—voltage required to maintain a spark across the spark plug electrodes |
| ● | Spark Duration (Burn)—time the spark is maintained across the spark plug electrodes. |
Min/Max and current values for Firing kV, Spark kV, and Spark Duration are displayed as digital values for each cylinder in the firing order. Intermittent problems that happen too fast to be seen on the live waveform (without pausing / reviewing) will be captured in the Min/Max reading, making it possible to spot problems that can be difficult to see in the live waveform.
Digital kV / Multiple Spark Ignition Systems
On vehicles with multiple spark ignition systems, when more than one spark per cylinder is present, Firing kV (FKV) is calculated at the start of the first spark and Spark kV (SKV) and Burn are calculated from the last spark.
To calculate the Digital kV and Burn measurements, select an ignition pattern with a 10 ms sweep, such as Parade 10 ms or Cyl 10 ms when testing a multiple spark system.
Digital kV cannot be correctly calculated if, in the Ignition Scope view, the end of the last spark for each cylinder is near the end of the screen or off of the screen.
The following ignition waveform information is intended as general theory reference only, using distributor type ignition illustration examples.
Ignition waveforms have three basic sections . An ignition event begins with a firing line at the left of the screen, continues through the intermediate and dwell sections, and ends with the beginning of another firing line at the right edge of the screen.
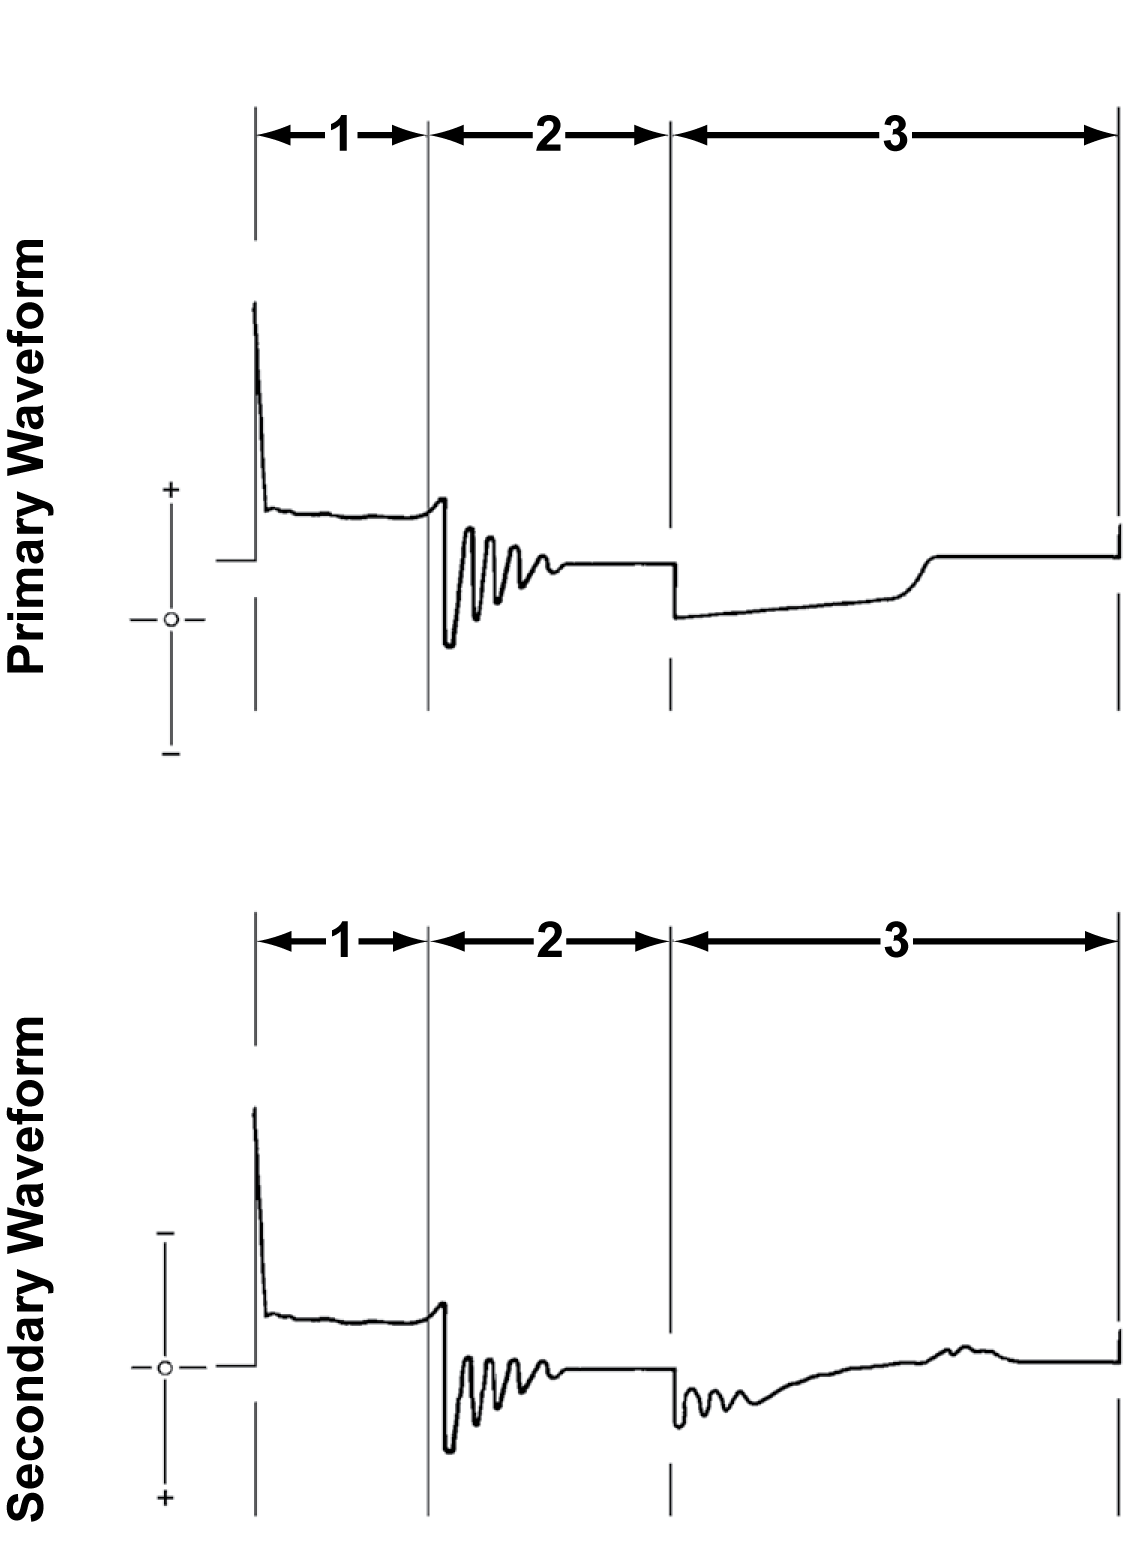
| 1. | Firing section |
| 2. | Intermediate section |
| 3. | Dwell section |
The Ignition Cycle
Waveforms have specific points that show important information when checking an ignition system. A complete ignition cycle of a cylinder runs from primary current switching on to the next primary current on event. Therefore, the description and explanation of the waveforms begins just before primary current switches on. See following page for description of image callouts.
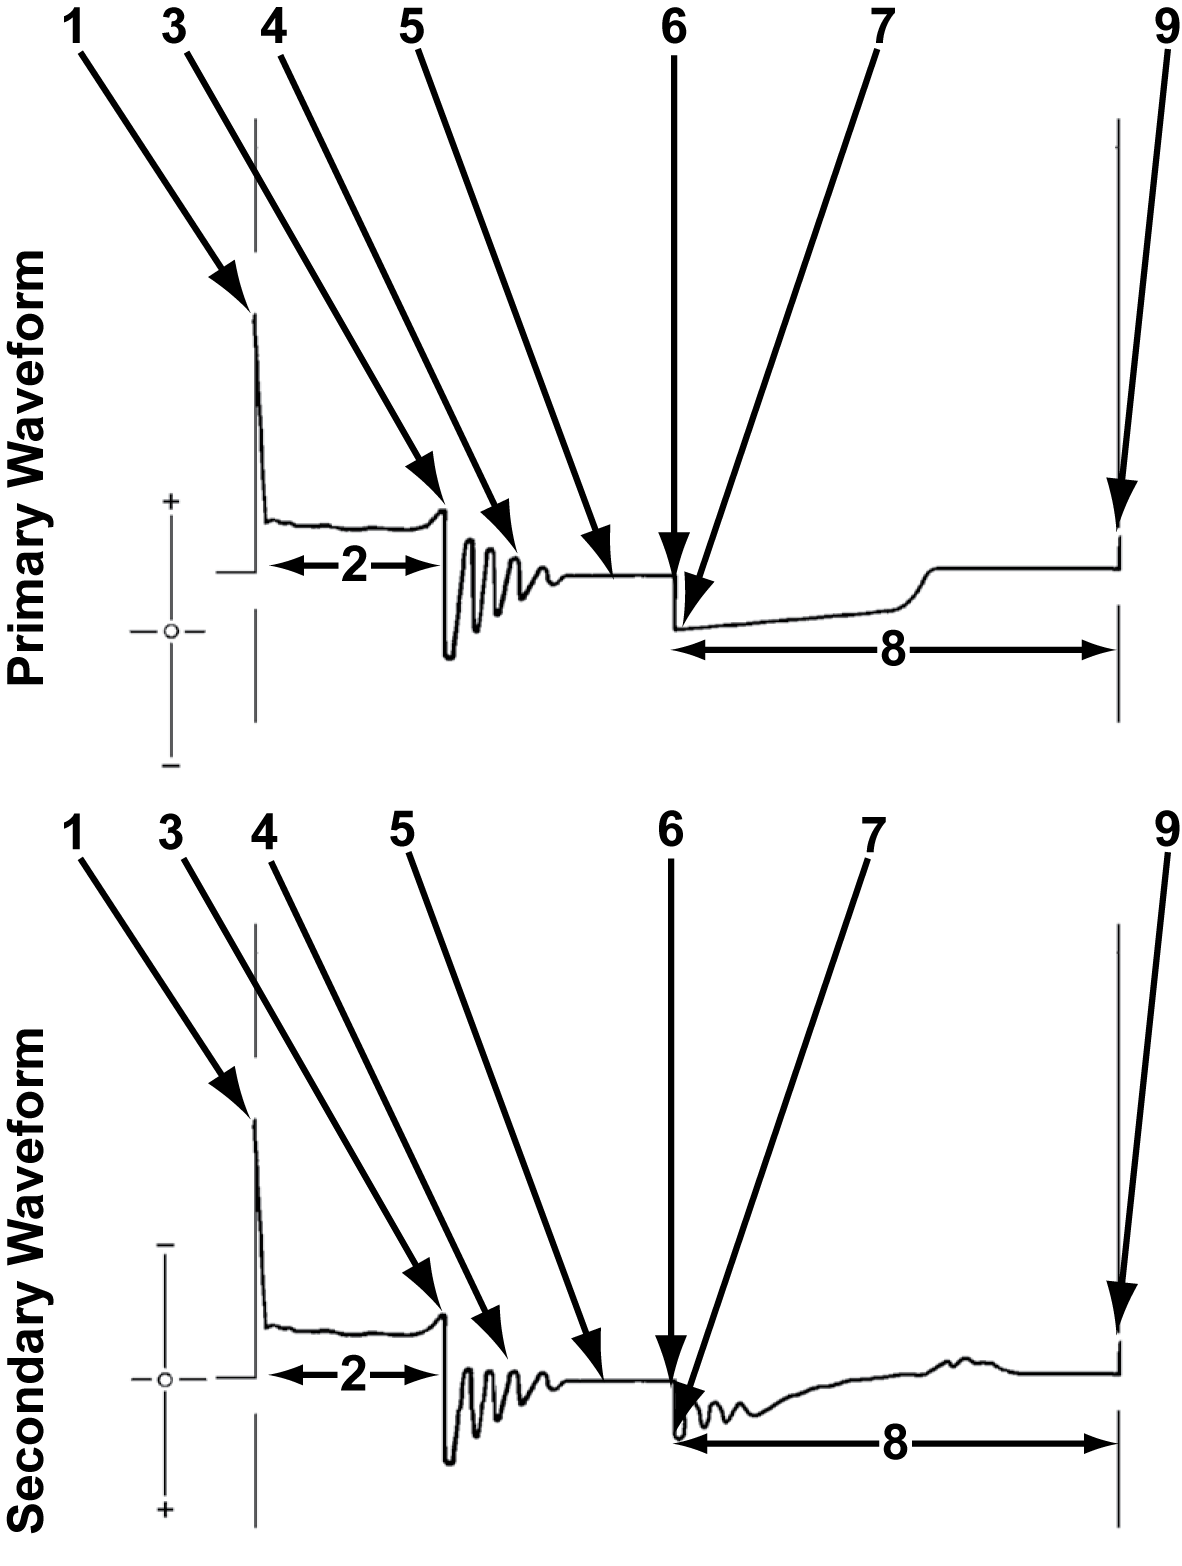
| 1. | Start of ignition |
| 2. | Spark line |
| 3. | End of ignition |
| 4. | Coil oscillations |
| 5. | No current in the primary coil |
| 6. | Primary current turns on |
| 7. | Start of primary current |
| 8. | Current limiting |
| 9. | Primary current turns off |
Sample ignition cycle
| ● | Start of Ignition (1) - High voltage is induced, by mutual induction, into the secondary winding because of the primary to secondary turns ratio. The secondary voltage overcomes the resistance in the secondary circuit up to the spark plug gap. The spark plug gap is ionized and current arcs across the electrodes to produce the spark that initiates combustion. |
| ● | Spark Line (2) - Voltage is reduced to about 1/100th of the secondary voltage, because of the 100:1 step-down ratio. This is the actual discharge across the air gap between the spark plug electrodes. |
| ● | End of Ignition (3) - The coil energy is no longer able to sustain the spark across the electrodes at this point. |
| ● | Coil Oscillations (4) - An oscillating voltage results (in step with the secondary voltage) because of the step-down ratio as current dissipates in the primary circuit. |
| ● | No Current in the Primary Coil (5) - The trace flattens out when there is no longer current in the primary ignition circuit. Battery or charging system voltage available at this point is about 12 to 15 volts. |
| ● | Primary Current Turns On (6) - The primary circuit switching device switches on the primary current. This starts the dwell period. |
| ● | Start of Primary Current (7) - Current in the primary circuit establishes a magnetic field in the ignition coil windings. The strength of the field builds during the dwell period. |
| ● | Current Limiting (8) - This represents the dwell period or “on-time” of the ignition coil primary current: |
| – | The rise in voltage (primary waveform) indicates that current limiting is occurring. |
| – | On ignition systems that use current limiting to control the coil current, a current hump or voltage ripple appears on the “on-time” portion of the primary waveform during the dwell section. |
| ● | Primary Current Turns Off (9) - The primary switching device stops the primary current flow suddenly. The magnetic field that had built up collapses. This induces a high voltage in the primary winding by self-induction. |