Selecting the File icon ![]() from the toolbar provides options for saving data files or configurations.
from the toolbar provides options for saving data files or configurations.
| ● | Save Configuration—saves the current setup values as a Preset. To open a saved Preset, select Preset from the main menu, see Presets. |
| ● | Save Single Frame—saves the data currently on the screen only. |
| ● | Save All Frames—saves the current screen plus all the data stored in the buffer. |
When either selection (Save Single Frame or Save All Frames) is made the data stored in buffer memory is written to a file. Saving data files is useful when trying to isolate an intermittent problem or to verify a repair during a road test. The saved file can be played back (similar to a movie clip) by selecting Data Manager > Scope Multimeter Data Folder. See Viewing Saved Files for additional information.
| 1. | Select File from the toolbar. |
| 2. | Select a save option from the dialog box. |
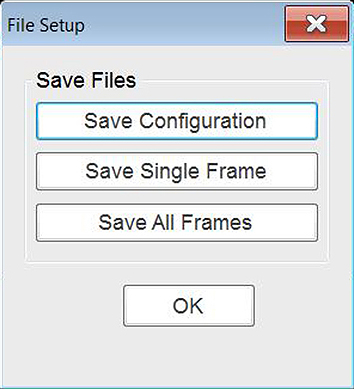
Sample file setup dialog box
The Windows Save As dialog box opens.
| 3. | Use the keyboard to name the file to be saved, then either select Save. |
A configuration description dialog box will open.
The description entered here is what displays in the information panel of the Data Manager.
| 4. | Use the keyboard to enter a description of the file to be saved. |
| 5. | Select OK to close the file setup dialog box. |
Once a configuration is saved it becomes available as a preset, see Presets. Files are saved to the Scope Multimeter Data Folder and can be retrieved through the Data Manager.