Setting PID triggers allows you to configure the diagnostic tool to automatically save PID data to a file, when a PID value meets an upper/lower limit (trigger point).
When a PID value meets the trigger point it activates the trigger which captures a short recording of all available PID data and saves it as a data file.
You can replay the saved data file to closely evaluate not only the PID that triggered the event, but all the PIDs being monitored to collectively see what was happening at the time of the event.
Trigger indicators and the arming control are shown below.
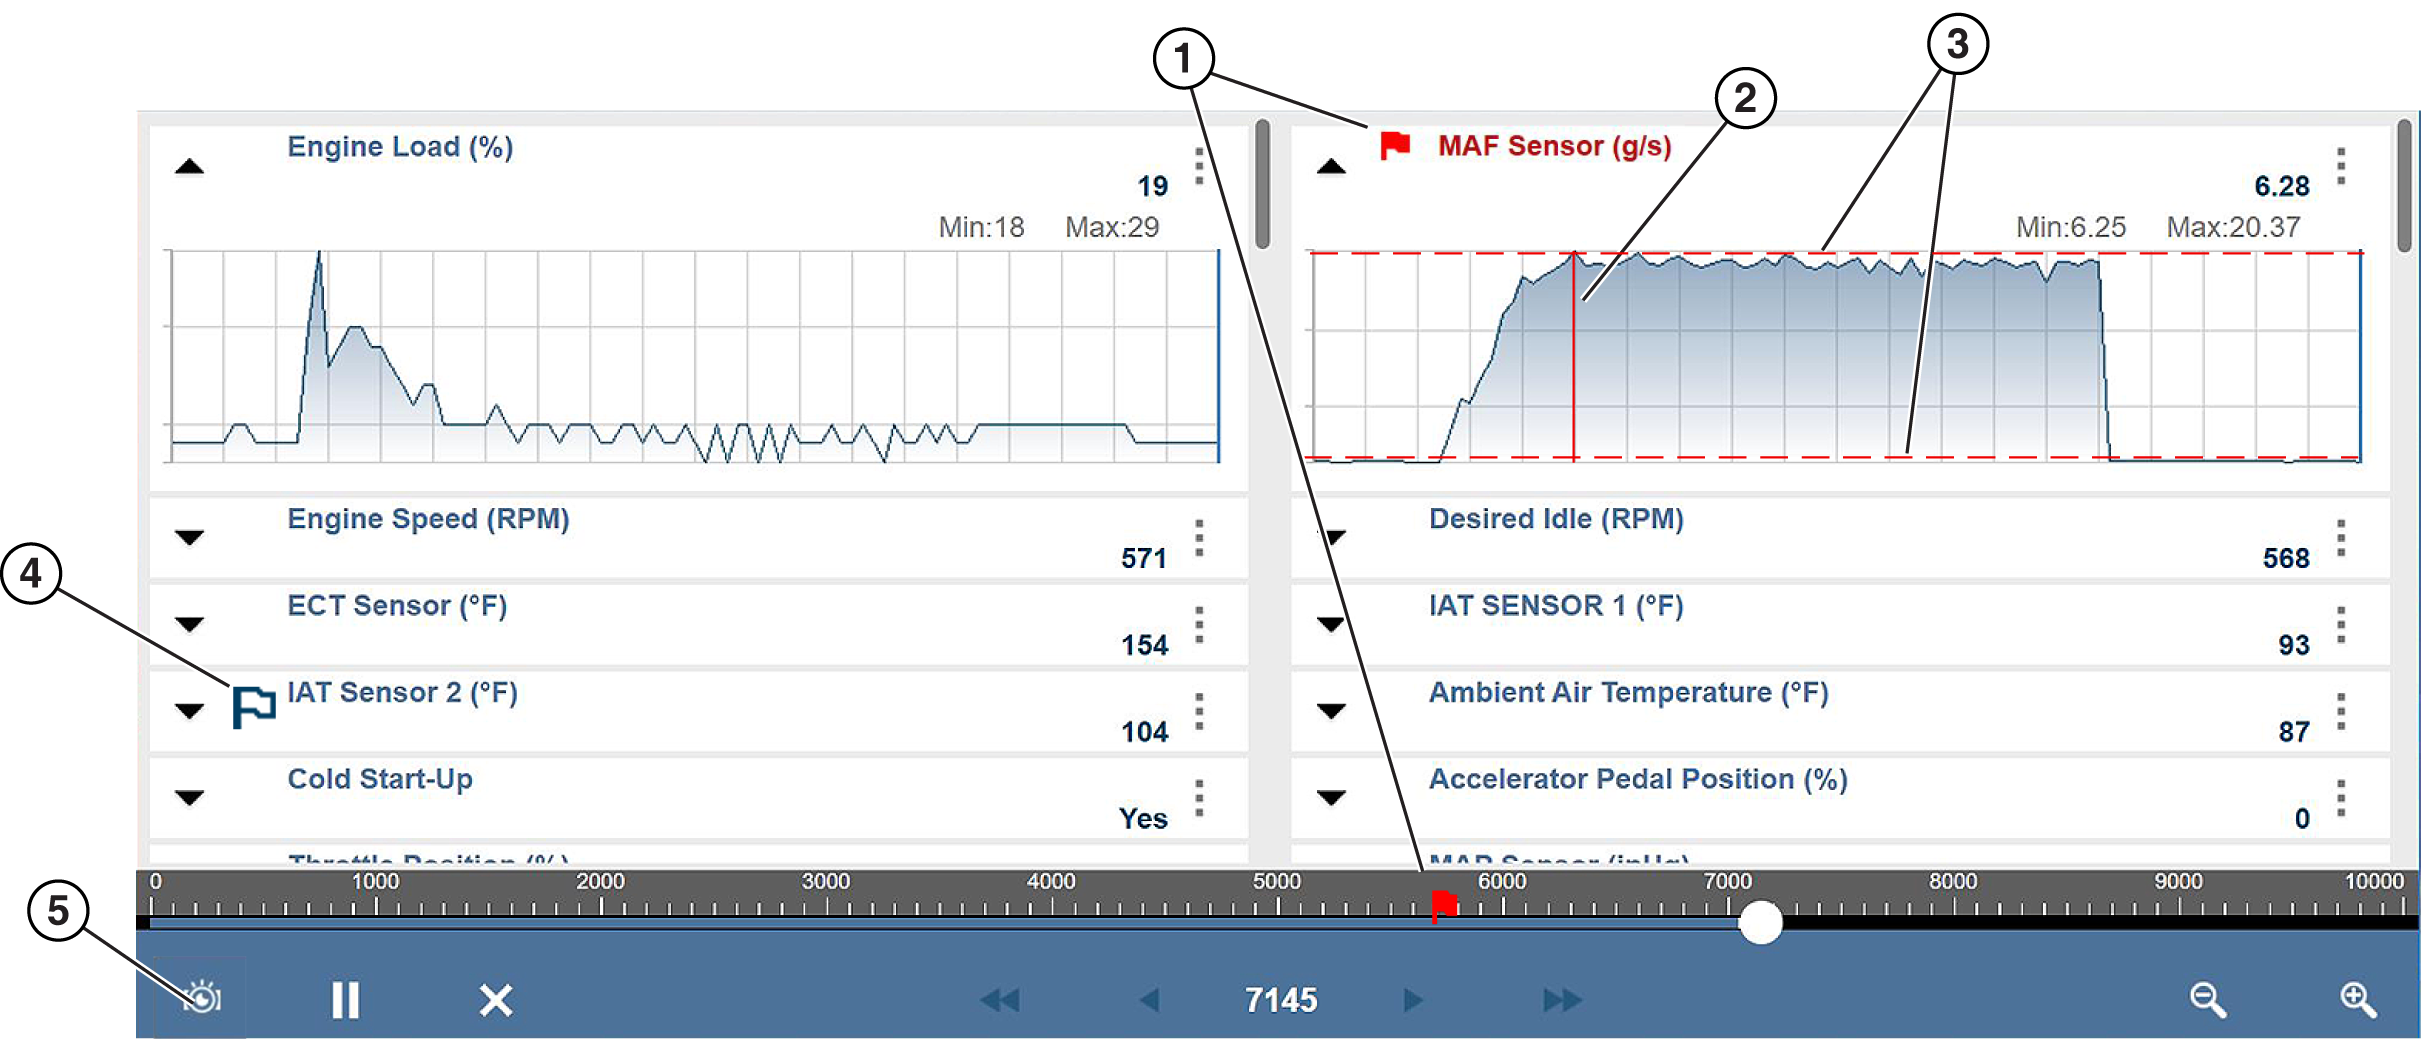
| 1. | Activated PID Trigger Indicator - Red flags and text indicate the PID trigger has activated. |
| 2. | Trigger Cursor - A red cursor line is displayed as a marker at the point the trigger was activated. |
| 3. | Upper and Lower Limit Lines - Limit lines indicate the upper and lower thresholds (trigger points). |
| 4. | Armed PID Trigger Indicator - A blue outlined flag indicates the PID trigger is armed. |
| 5. | Trigger Arm Control Icon - Select this icon to arm/disarm all PID triggers. |
PID Trigger Status Icons
The icons (below) are used to help you quickly identify the status of individual PID triggers:
|
Icon |
Description |
|
Trigger Armed |
Trigger has been set (configured) and is armed. |
|
|
|
|
Trigger Activated |
Trigger has been activated (upper or lower limit has been met). |
|
|


To use triggers, they must be turned on, set (configured), and then armed. Use the following procedures to setup PID triggers. See Trigger Arming / Disarming for trigger arming/disarming information.
► To adjust the amount of data collected after a trigger activates:
| 1. | Select Properties from the toolbar. |
| 2. | Highlight one of the Samples After Trigger options (0, 5, 10, 20, 50, 100, 200, 500 or 100). |
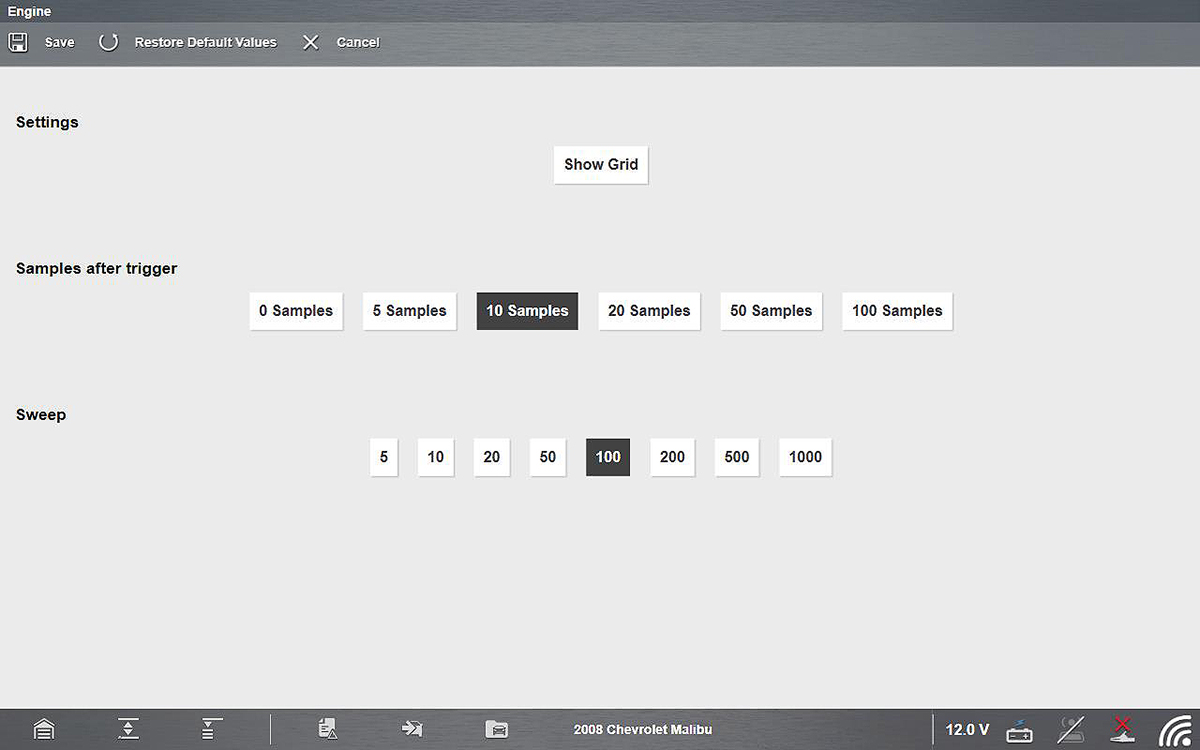
Properties screen
| 3. | Select Save. |
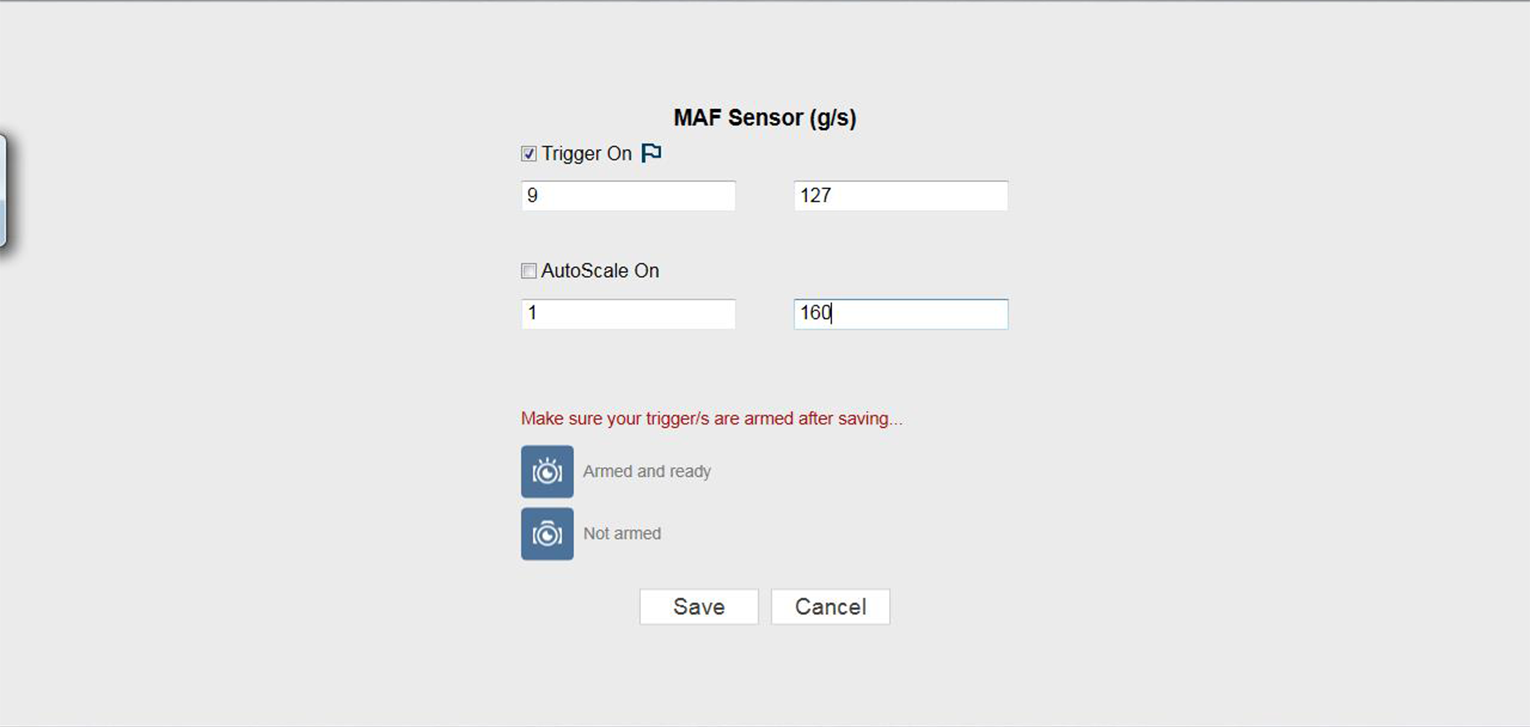
► To turn a trigger on, and set upper/lower trigger limits:
| 1. | Select the Menu icon  on the PID you want to set a trigger on. on the PID you want to set a trigger on. |
| 2. | Select Setup. |
The properties dialog box opens.
| 3. | To turn the trigger on select the Trigger On checkbox. |
| 4. | Enter the desired upper threshold trigger limit in the Max field. |
| 5. | Enter the desired lower threshold trigger limit in the Min field. |
| 6. | Select Save. |
| 7. | To arm the trigger, see Trigger Arming / Disarming . |
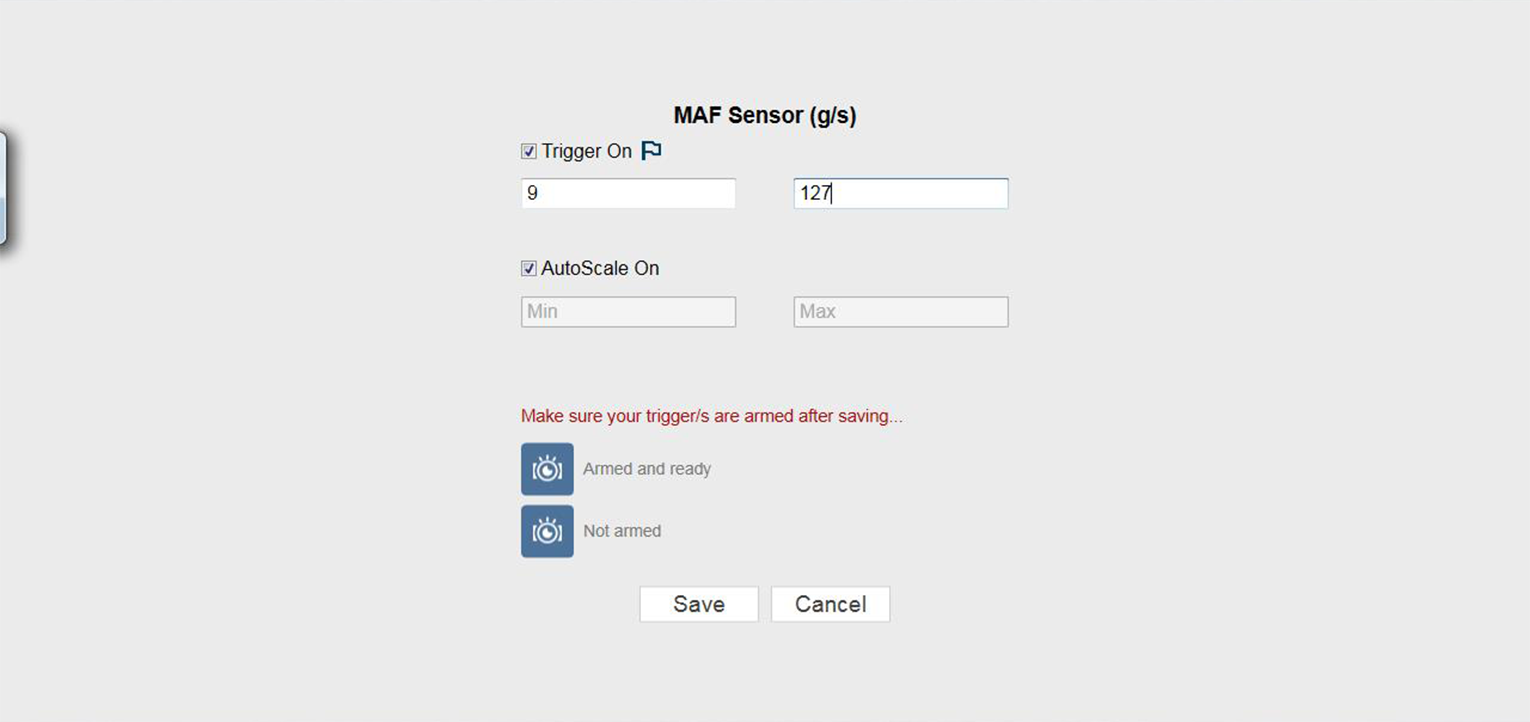
Typical - Trigger Max/Min settings
Upper and lower trigger limit lines (red) are displayed on the graph.
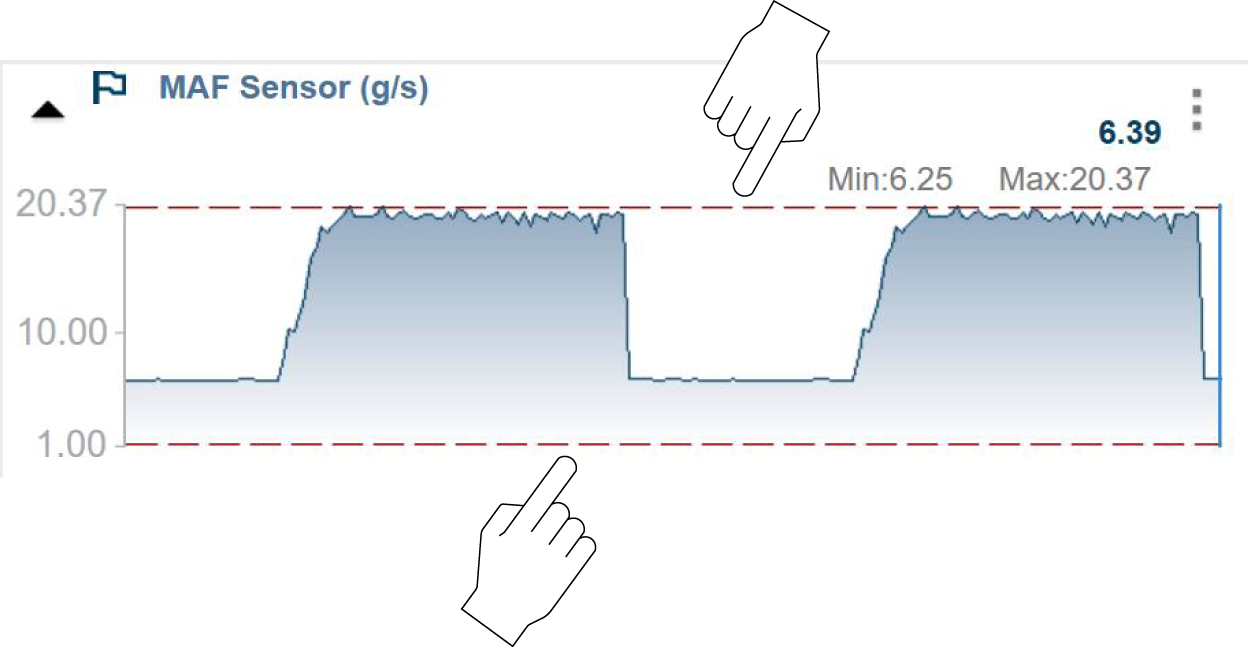
Typical - Trigger upper/lower limit lines
► To use Autoscale or set the scale manually:
Autoscale On - The graph scale (vertical axis range) is automatically adjusted based upon the minimum and maximum PID values. Autoscale On (checkbox selected) is the default setting, and can be used for most testing. To access this setting:
| 1. | Select the Menu icon  on the PID you want to set. on the PID you want to set. |
| 2. | Select Setup. |
The properties dialog box opens.
| 3. | Select Autoscale checkbox. |
Autoscale Off (manual setup) - Allows you to set the Graph scale (vertical axis range).
To manually set the scale:
| 1. | Select the Menu icon  on the PID you want to set. on the PID you want to set. |
| 2. | Select Setup. |
The properties dialog box opens.
| 3. | Deselect the Autoscale checkbox. |
The check mark is cleared from the box and the minimum and maximum fields activate.
| 4. | Enter the desired upper limit in the Max field. |
| 5. | Enter the desired lower limit in the Min field. |
| 6. | Select Save. |
| 7. | To arm the trigger, see Trigger Arming / Disarming . |
Minimum scale setting must be less than the maximum scale setting:
Manual scale setup (w/trigger set)
The vertical scale is now at the set values.
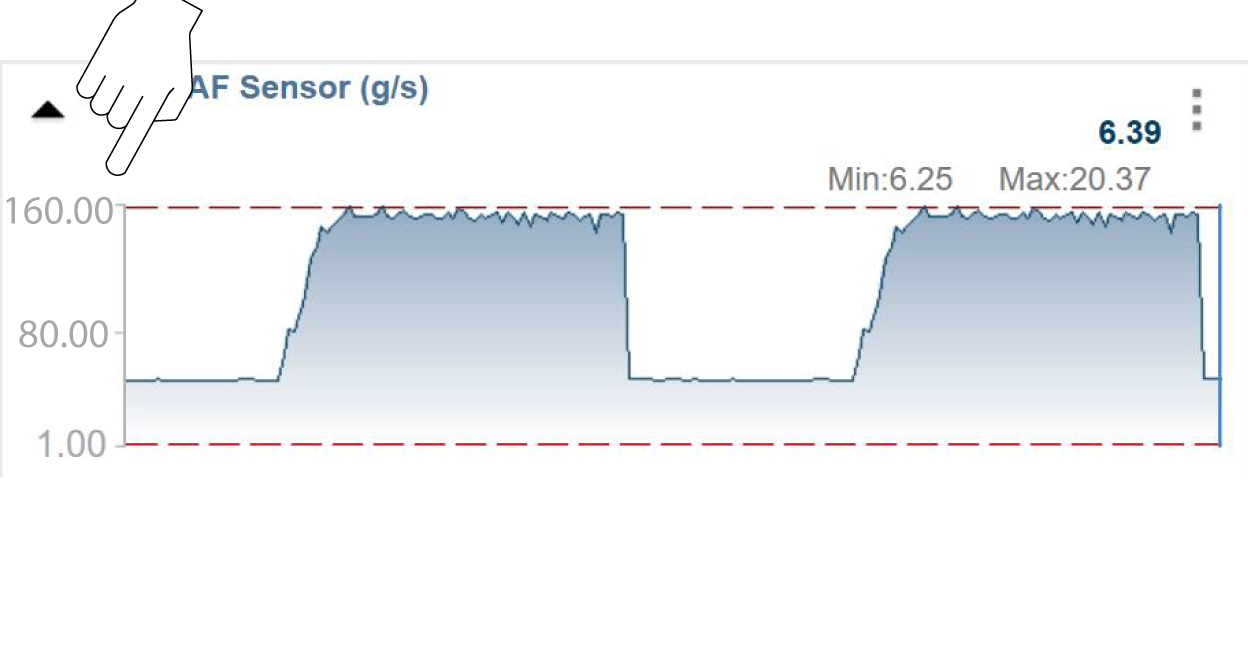
A trigger is activated (displays red flag)  when a PID value meets an upper/lower limit (trigger point).
When a trigger is activated:
| ● | Data collection is briefly paused as the Scanner captures a short recording of all available PID data from just before the trigger point to just after, and saves it as a data file. |
| ● | A message displays indicating a data file was saved. |
| ● | Data collection restarts. Note - Triggers for other PIDs (not activated) will continue to be armed. |
| ● | The activated PID trigger is disarmed. Note - if a different PID trigger is activated subsequently, the previously recorded data file will be over written. |
| ● | A solid red cursor line is displayed on the graph of the PID with the activated trigger to indicate where the trigger occurred. Dashed red cursor lines are displayed on all the other PID graphs to indicate their relationship to where the trigger occurred. A red flag is also displayed on the data buffer scale indicating where the trigger occurred. |
During playback click on the red flag on the scale to quickly jump back and view where the trigger occurred in the PID graph view.
| ● | The PID name, flag icon, and current value all change color to red on the PID with the activated trigger. |
| – | Note - When data collection restarts the current value may switch from red to blue as the data runs over the limit and returns within limits. |
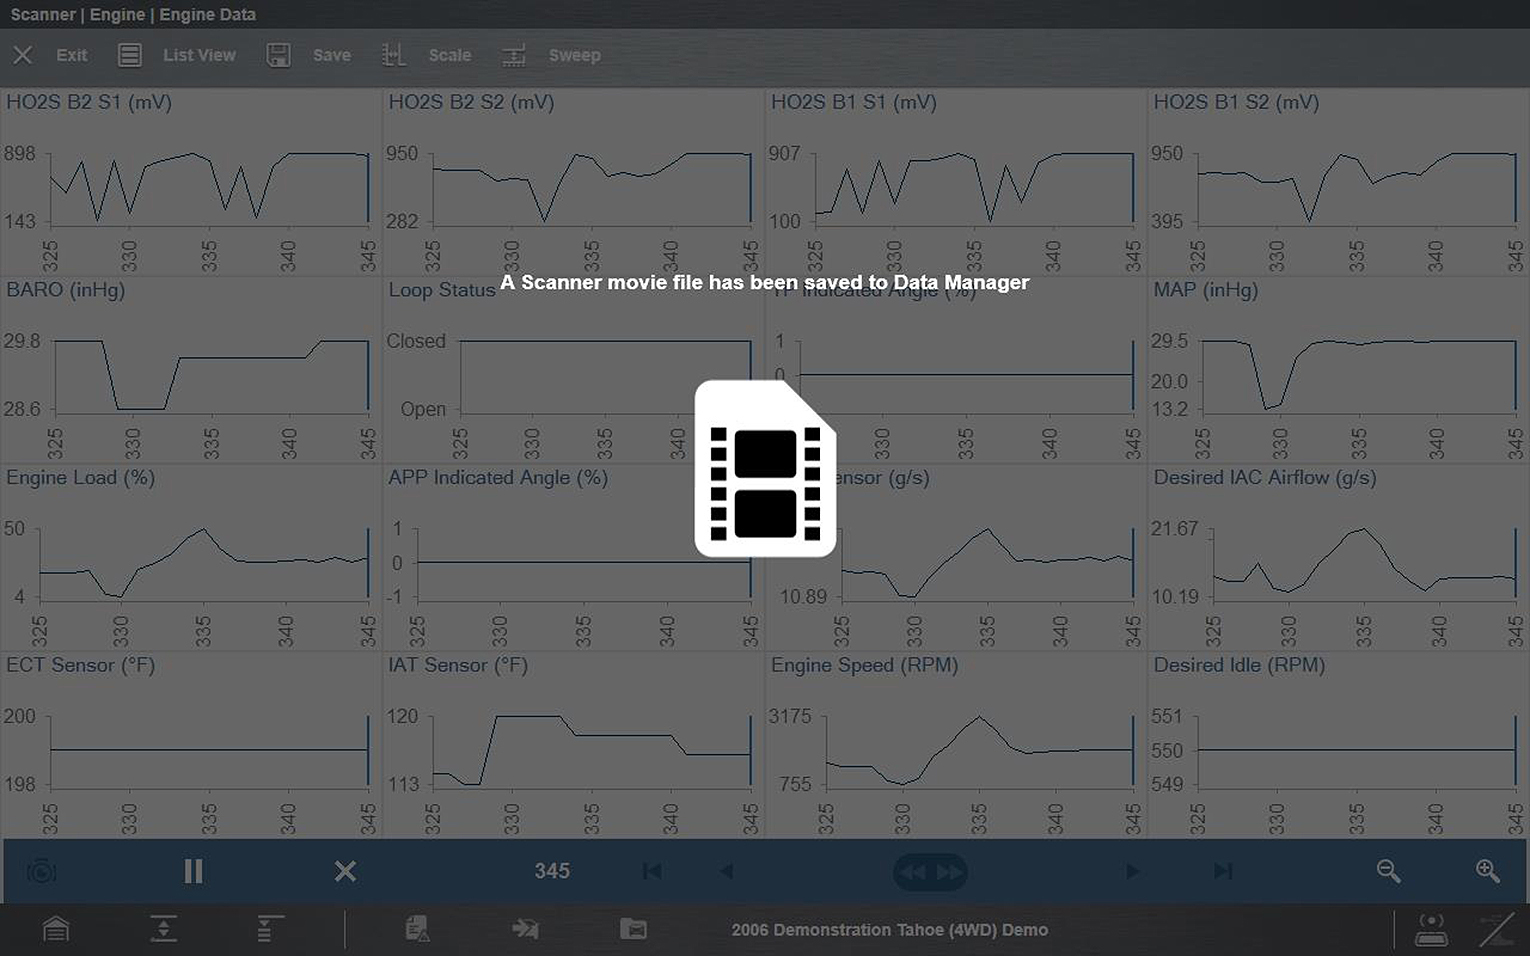
Typical - Activated trigger saved data file screen
Arming - arms all triggers to record data if a trigger is activated.
Disarming - prevents all triggers from activating.
Select the trigger arm control icon (in the data control toolbar) to arm or disarm all triggers.
|
Trigger Arm Control Icons |
Description |
|
|
(Flashing Icon) When this icon is flashing, the triggers are not armed and no data capture will occur. (Select this icon to arm) |
|
|
When this icon is continuously displayed, triggers are armed, and ready to capture data. (Select this icon to disarm) |


If trigger settings are modified, or are added for other PIDs, they are armed as soon as you exit the setting screen.
Rearming Activated Triggers
Once a PID trigger has activated, you cannot use the Trigger Arm Control Icon to rearm that trigger.
To rearm an activated trigger use one of the following methods:
Rearm Individual Trigger
| a. | Select the Menu icon  on the PID you want to rearm the trigger on. on the PID you want to rearm the trigger on. |
| b. | Select Setup. |
| c. | From the properties dialog box, select Save. This rearms the trigger using the original trigger points. If different trigger points are needed, change the Max/Min values and then select Save. |
Rearm All Triggers and Clear Data
| a. | Select the Clear icon  . . |
| b. | From the confirmation screen select Yes. |


